
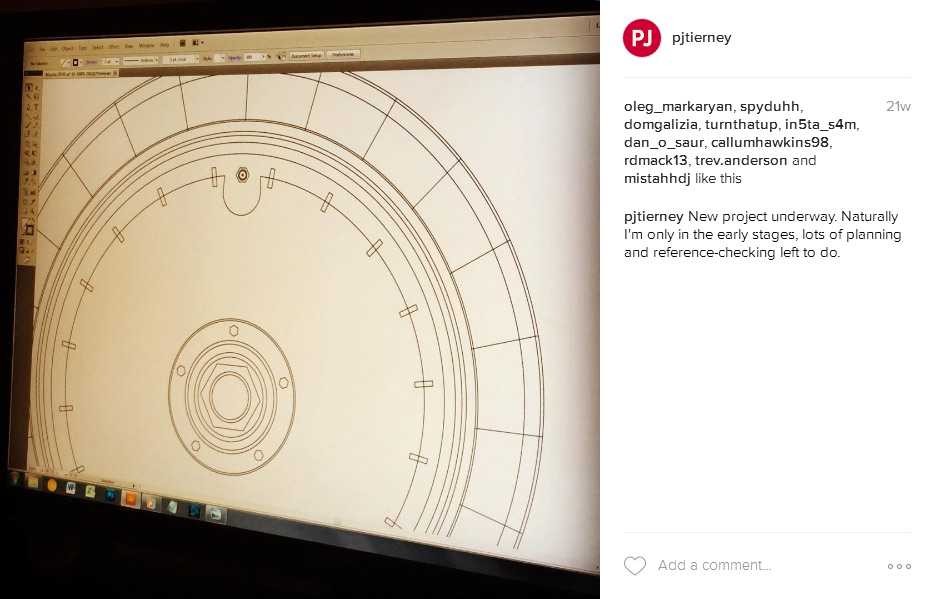
New project underway. Naturally I'm only in the early stages, lots of planning and reference-checking left to do.
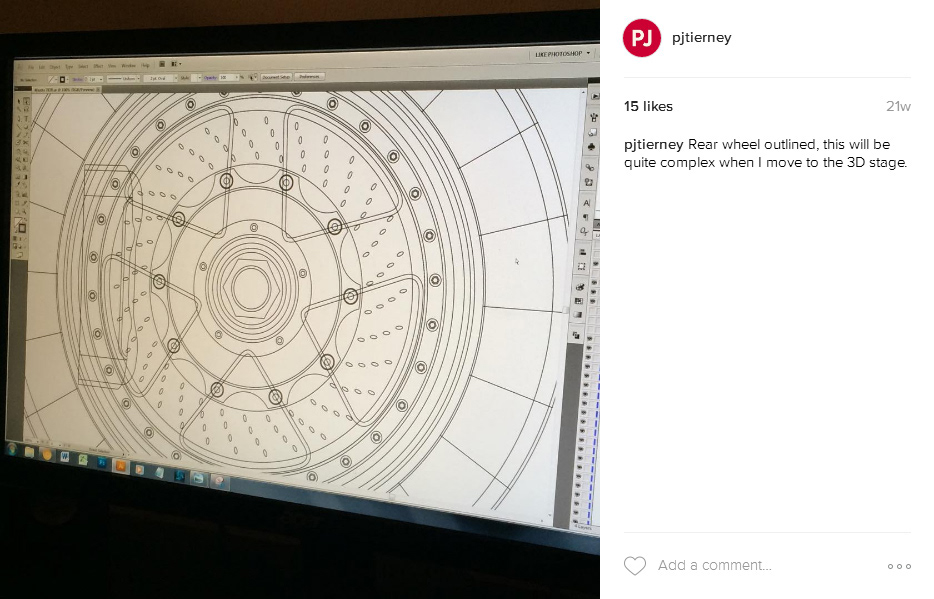
Rear wheel outlined, this will be quite complex when I move to the 3D stage.
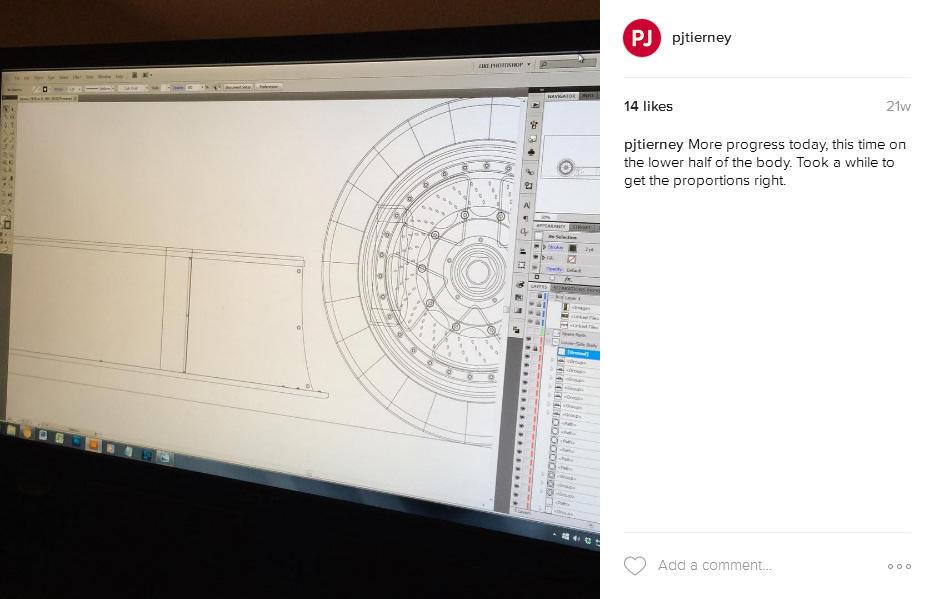
More progress today, this time on the lower half of the body. Took a while to get the proportions right.
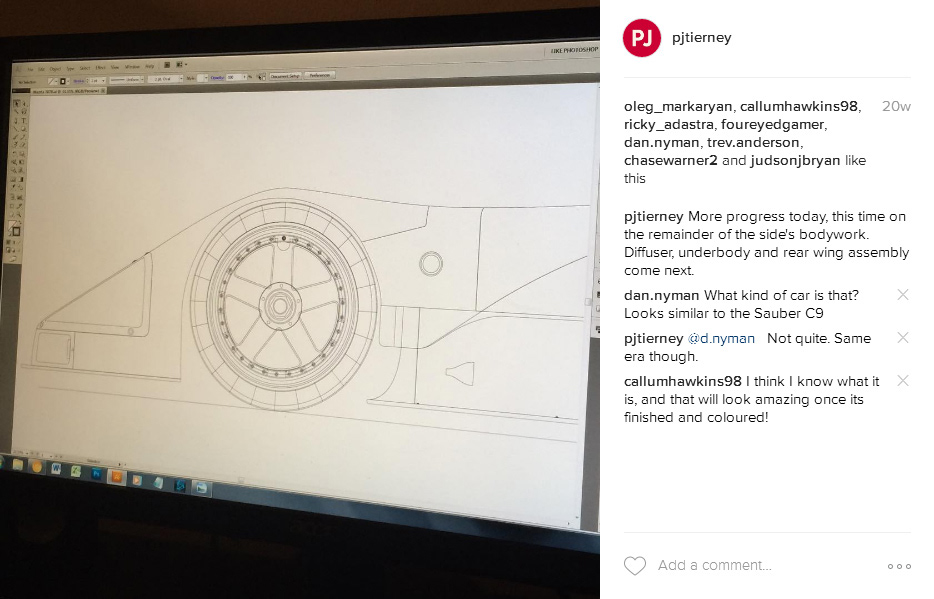
More progress today, this time on the remainder of the side's bodywork. Diffuser, underbody and rear wing assembly come next.
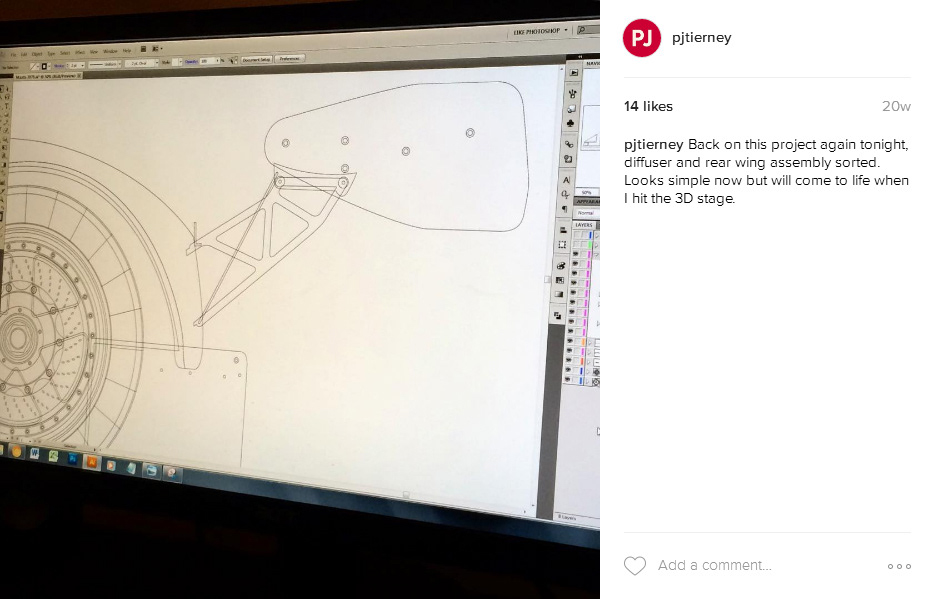
Back on this project again tonight, diffuser and rear wing assembly sorted. Looks simple now but will come to life when I hit the 3D stage.
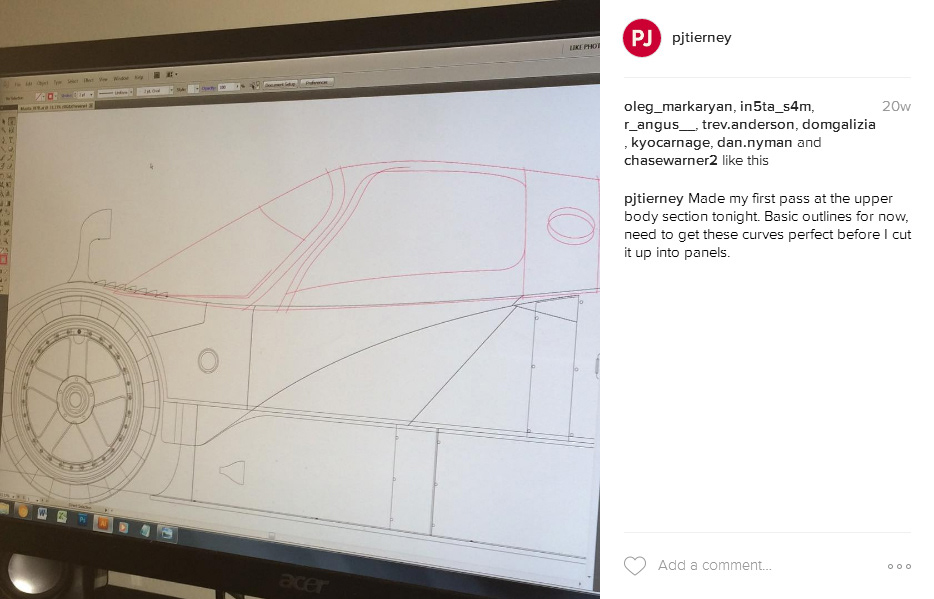
Made my first pass at the upper body section tonight. Basic outlines for now, need to get these curves perfect before I cut it up into panels.
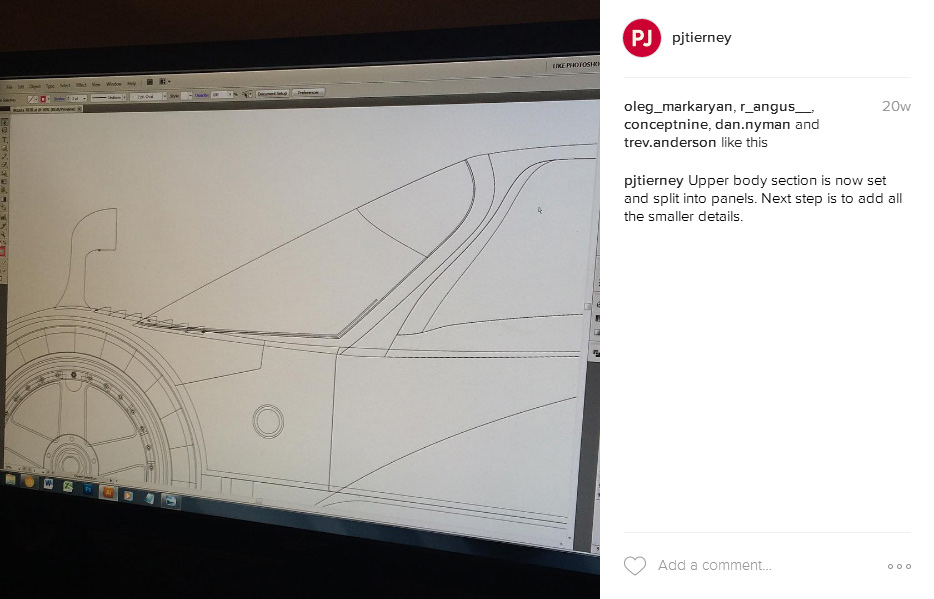
Upper body section is now set and split into panels. Next step is to add all the smaller details.
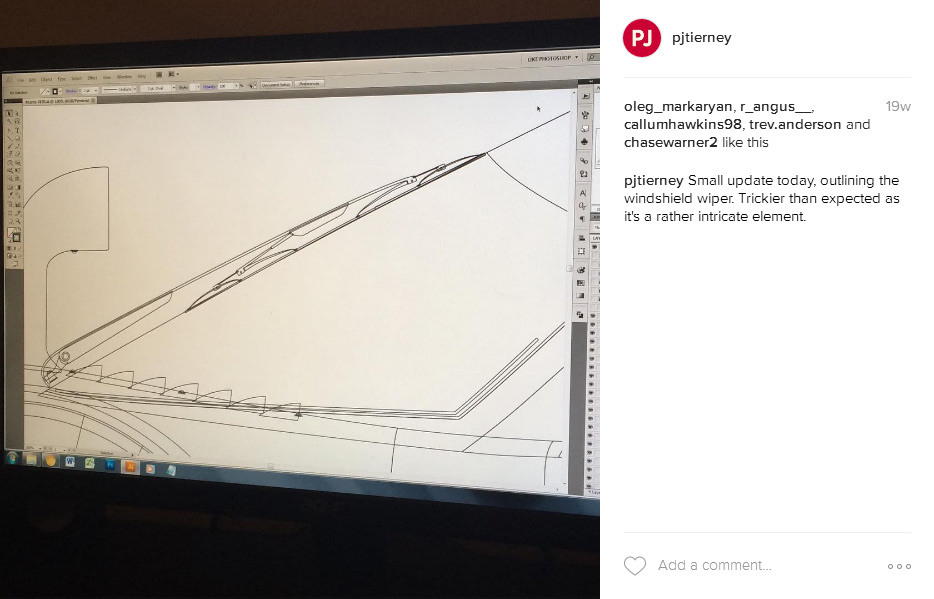
Small update today, outlining the windshield wiper. Trickier than expected as it's a rather intricate element.
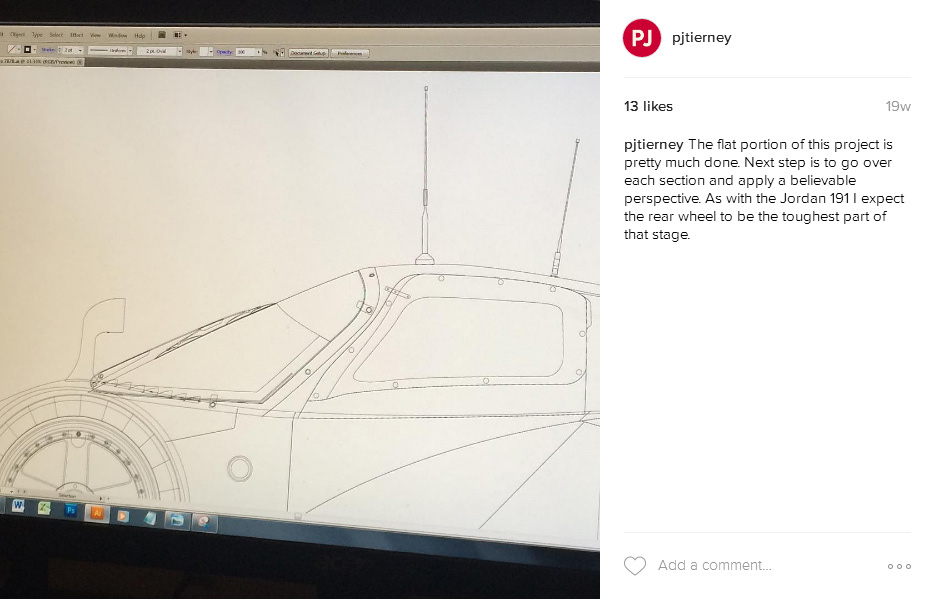
The flat portion of this project is pretty much done. Next step is to go over each section and apply a believable perspective. As with the Jordan 191 I expect the rear wheel to be the toughest part of that stage.
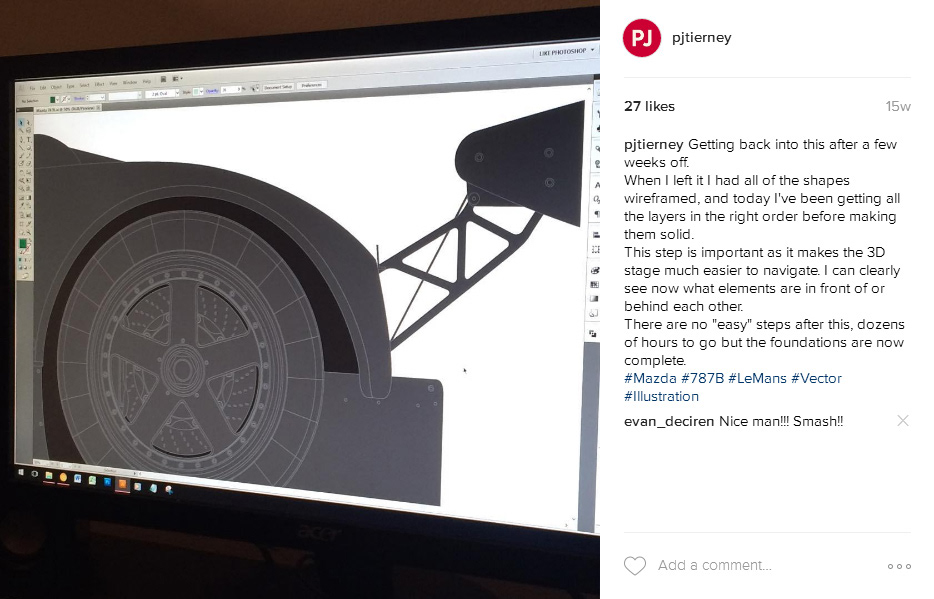
Getting back into this after a few weeks off.
When I left it I had all of the shapes wireframed, and today I've been getting all the layers in the right order before making them solid. This step is important as it makes the 3D stage much easier to navigate.
I can clearly see now what elements are in front of or behind each other. There are no "easy" steps after this, dozens of hours to go but the foundations are now complete.
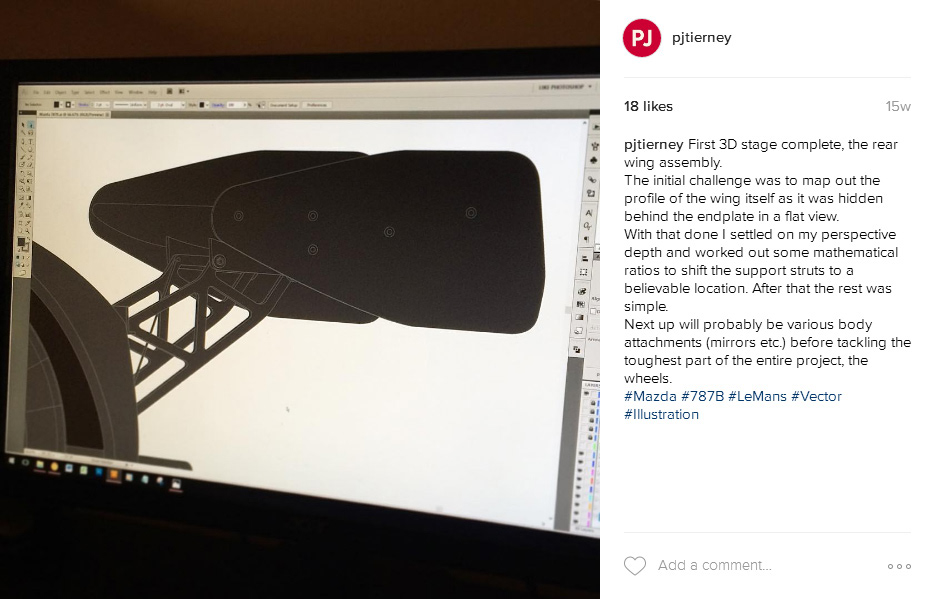
First 3D stage complete, the rear wing assembly.
The initial challenge was to map out the profile of the wing itself as it was hidden behind the endplate in a flat view.
With that done I settled on my perspective depth and worked out some mathematical ratios to shift the support struts to a believable location. After that the rest was simple.
Next up will probably be various body attachments (mirrors etc.) before tackling the toughest part of the entire project, the wheels.

The upper body's pretty much done in terms of adding depth.
The tricky part here came when dealing with how the perspective variances converge when you get towards the center. While there are 10 or so "clicks" between the wing mirrors that reduced to almost zero by the time I get to the door's window cutout.
Additionally the mirrors themselves are slightly angled which means you see more of the "back" mirror than the front. It looks awkward in isolation but when you see the full piece it'll make sense and "fit".
Next up is to add depth to the lower bodywork before tackling the wheels. Unlike the Jordan 191 there are a lot of large panels flush with the viewing pane which makes things much easier.
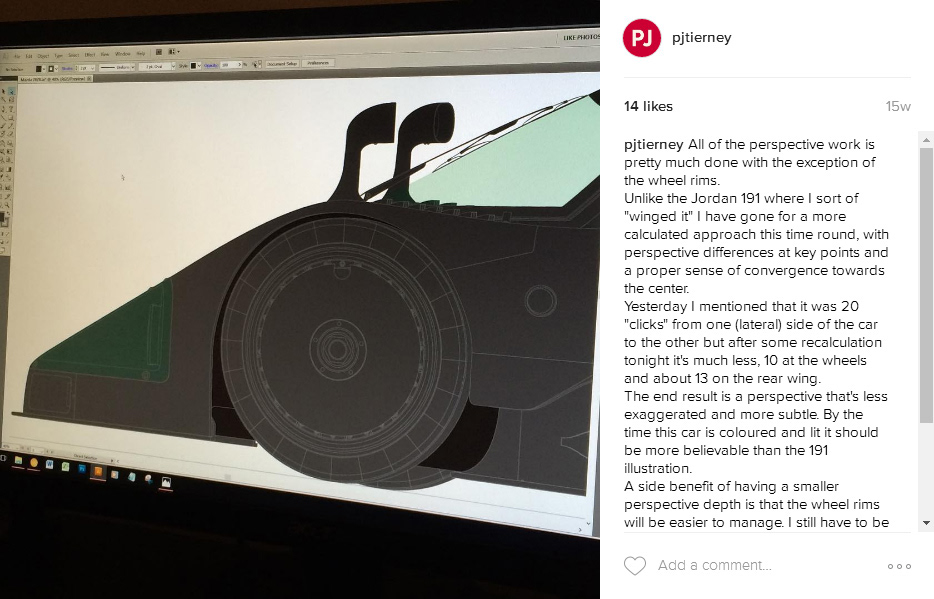
All of the perspective work is pretty much done with the exception of the wheel rims.
Unlike the Jordan 191 where I sort of "winged it" I have gone for a more calculated approach this time round, with perspective differences at key points and a proper sense of convergence towards the center.
Yesterday I mentioned that it was 20 "clicks" from one (lateral) side of the car to the other but after some recalculation tonight it's much less, 10 at the wheels and about 13 on the rear wing.
The end result is a perspective that's less exaggerated and more subtle. By the time this car is coloured and lit it should be more believable than the 191 illustration.
A side benefit of having a smaller perspective depth is that the wheel rims will be easier to manage. I still have to be a bit of a layer ninja to get the depths right but it won't be anywhere near as tricky as the Jordan's wheels.
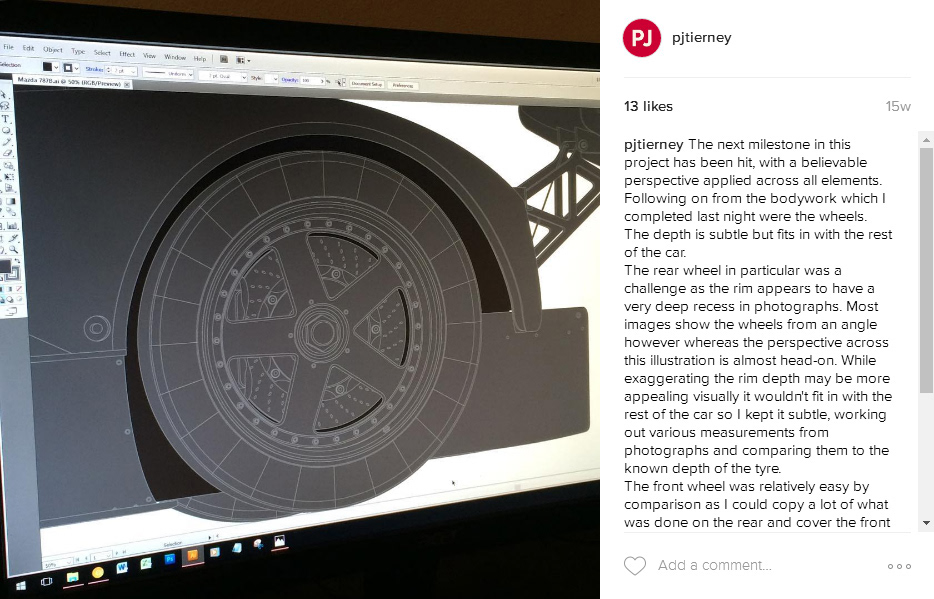
The next milestone in this project has been hit, with a believable perspective applied across all elements.
Following on from the bodywork which I completed last night were the wheels. The depth is subtle but fits in with the rest of the car.
The rear wheel in particular was a challenge as the rim appears to have a very deep recess in photographs. Most images show the wheels from an angle however whereas the perspective across this illustration is almost head-on.
While exaggerating the rim depth may be more appealing visually it wouldn't fit in with the rest of the car so I kept it subtle, working out various measurements from photographs and comparing them to the known depth of the tyre.
The front wheel was relatively easy by comparison as I could copy a lot of what was done on the rear and cover the front with the aerodynamic panel that was used at Le Mans in 1991.
The next stage is to apply lighting across the entire car, going over every single layer. My document already has over 1000 paths at the moment. That will triple by the time I hit the next milestone.

Started working on the lighting this evening, the glossy highlights in particular.
Overall the lighting will consist of 3 stages: Gloss, Highlights and Shadows. The Gloss is the easiest as there are no gradients or meshes involved.
The key role of the gloss is to help define the shape of each element a bit more. Unlike the Jordan illustration where I used reference lighting from a scale model, I'm doing this all independently.
In addition to this I'm also going through each of the side panels and rounding out their corners, as car panels rarely have squared-off corners. It's a detail that'll only be seen up close, but if I ever print this in large scale (A1) it's something that would show up easily.
The gloss is pretty much limited to the upper bodywork but will help direct the rest of my lighting, which will help when I get to the *really* complicated stuff.
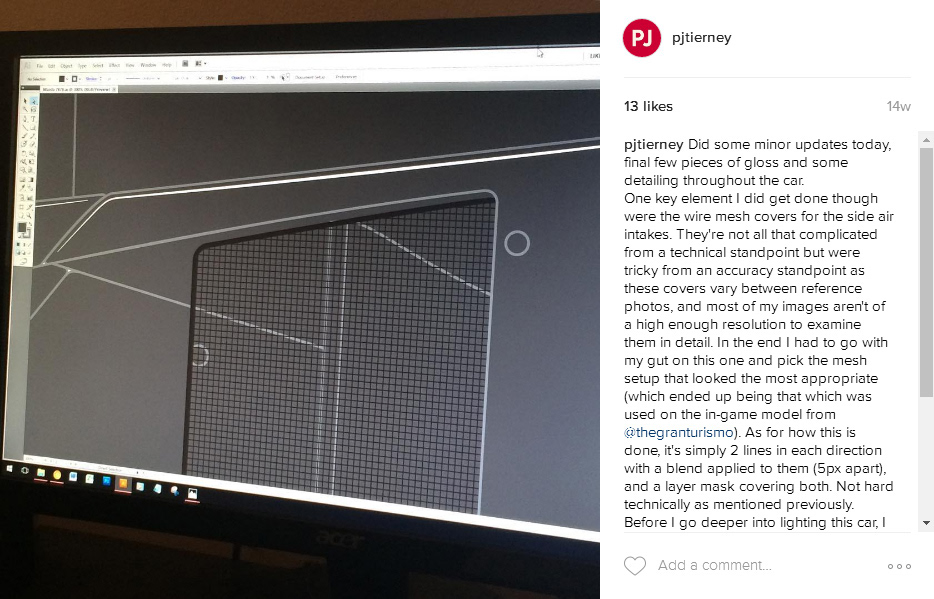
Did some minor updates today, final few pieces of gloss and some detailing throughout the car.
One key element I did get done though were the wire mesh covers for the side air intakes. They're not all that complicated from a technical standpoint but were tricky from an accuracy standpoint as these covers vary between reference photos, and most of my images aren't of a high enough resolution to examine them in detail.
In the end I had to go with my gut on this one and pick the mesh setup that looked the most appropriate (which ended up being that which was used on the in-game model from @thegranturismo). As for how this is done, it's simply 2 lines in each direction with a blend applied to them (5px apart), and a layer mask covering both. Not hard technically as mentioned previously.
Before I go deeper into lighting this car, I think my next step will be to flesh out all of the minor details such as buttons, pins and whatnot. They are all pretty small which means that any larger lighting effects won't affect them much.
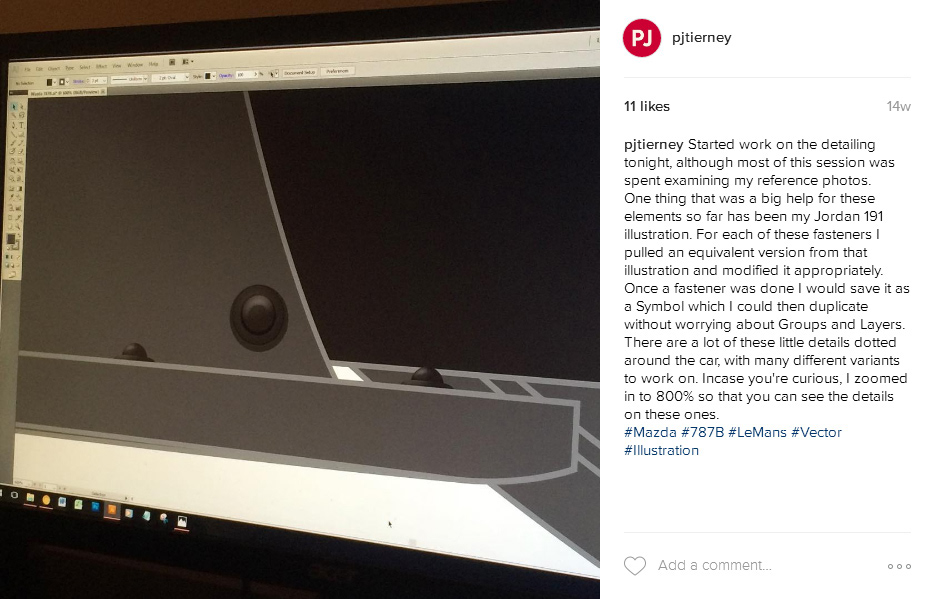
Started work on the detailing tonight, although most of this session was spent examining my reference photos.
One thing that was a big help for these elements so far has been my Jordan 191 illustration. For each of these fasteners I pulled an equivalent version from that illustration and modified it appropriately.
Once a fastener was done I would save it as a Symbol which I could then duplicate without worrying about Groups and Layers.
There are a lot of these little details dotted around the car, with many different variants to work on. Incase you're curious, I zoomed in to 800% so that you can see the details on these ones.
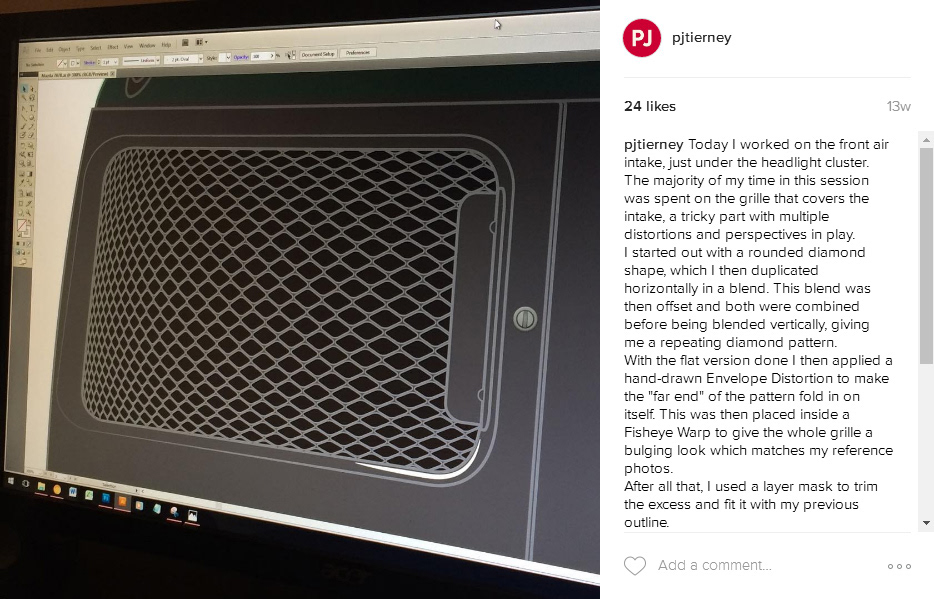
Today I worked on the front air intake, just under the headlight cluster. The majority of my time in this session was spent on the grille that covers the intake, a tricky part with multiple distortions and perspectives in play.
I started out with a rounded diamond shape, which I then duplicated horizontally in a blend. This blend was then offset and both were combined before being blended vertically, giving me a repeating diamond pattern.
With the flat version done I then applied a hand-drawn Envelope Distortion to make the "far end" of the pattern fold in on itself. This was then placed inside a Fisheye Warp to give the whole grille a bulging look which matches my reference photos.
After all that, I used a layer mask to trim the excess and fit it with my previous outline.
The whole process took over an hour of experimenting but shape-wise it looks good, and will sit better with the rest of the front end once I finish the lighting.
It's the most intricate piece of vector-work seen on the car so far, with many different functions and processes combined into a single element. I wouldn't have been able to create something like this a year ago, that's for sure.
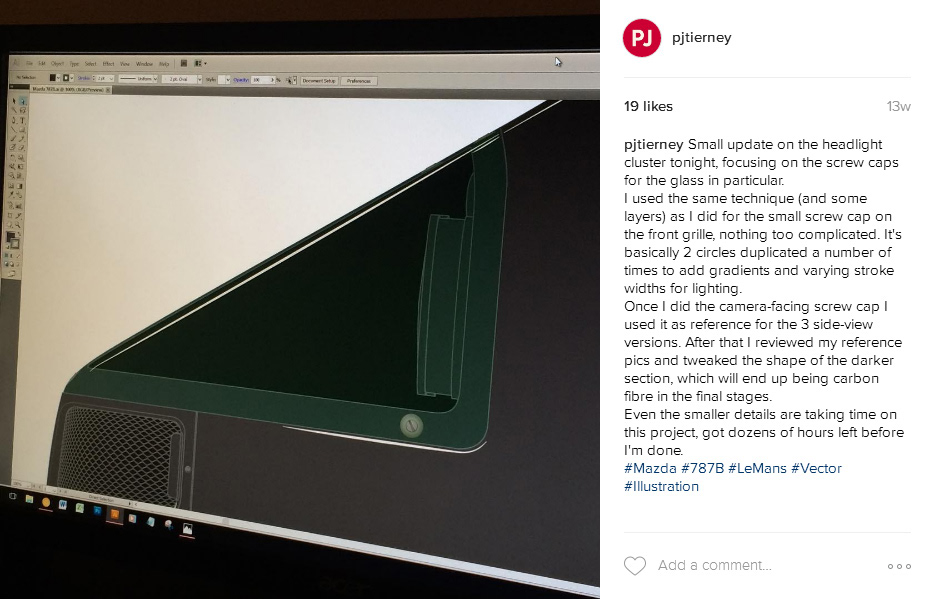
Small update on the headlight cluster tonight, focusing on the screw caps for the glass in particular.
I used the same technique (and some layers) as I did for the small screw cap on the front grille, nothing too complicated. It's basically 2 circles duplicated a number of times to add gradients and varying stroke widths for lighting.
Once I did the camera-facing screw cap I used it as reference for the 3 side-view versions. After that I reviewed my reference pics and tweaked the shape of the darker section, which will end up being carbon fibre in the final stages.
Even the smaller details are taking time on this project, got dozens of hours left before I'm done.
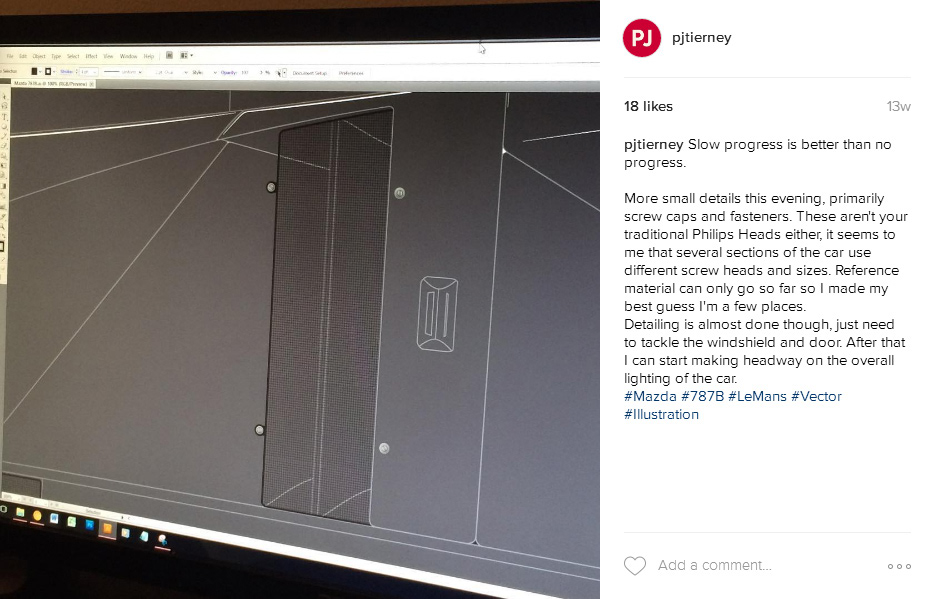
Slow progress is better than no progress.
More small details this evening, primarily screw caps and fasteners.These aren't your traditional Philips Heads either, it seems to me that several sections of the car use different screw heads and sizes.
Reference material can only go so far so I made my best guess I'm a few places.
Detailing is almost done though, just need to tackle the windshield and door. After that I can start making headway on the overall lighting of the car.
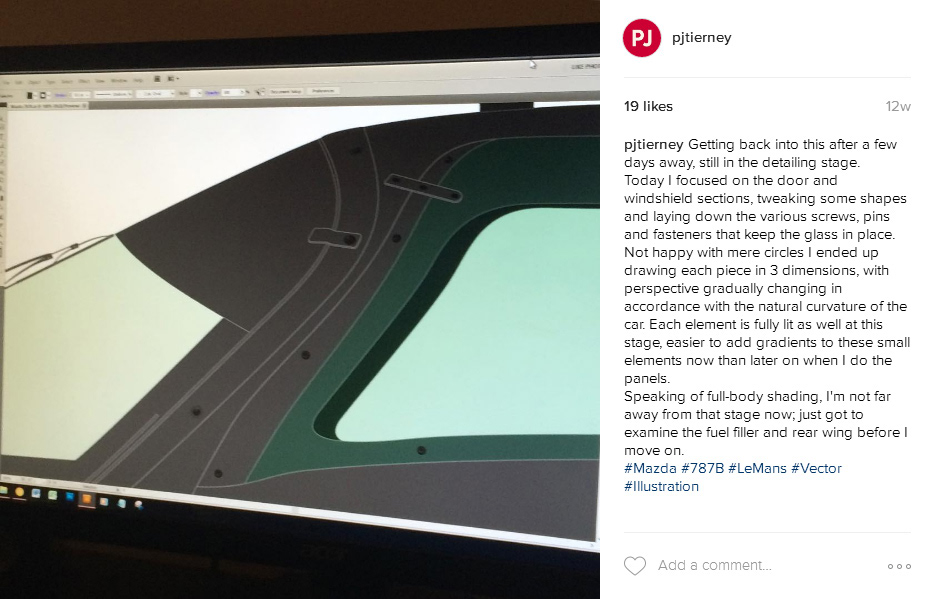
Getting back into this after a few days away, still in the detailing stage.
Today I focused on the door and windshield sections, tweaking some shapes and laying down the various screws, pins and fasteners that keep the glass in place.
Not happy with mere circles I ended up drawing each piece in 3 dimensions, with perspective gradually changing in accordance with the natural curvature of the car.
Each element is fully lit as well at this stage, easier to add gradients to these small elements now than later on when I do the panels.
Speaking of full-body shading, I'm not far away from that stage now; just got to examine the fuel filler and rear wing before I move on.
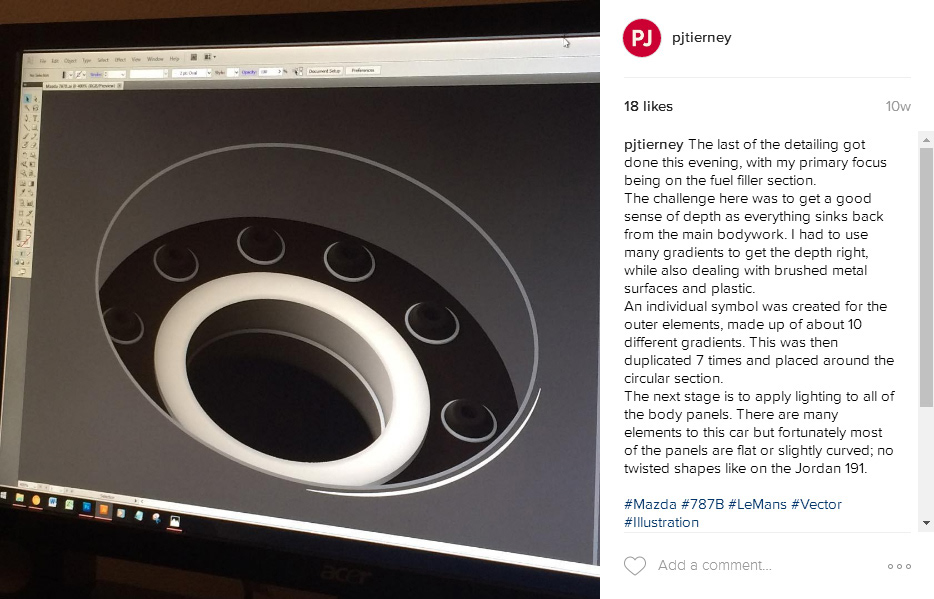
The last of the detailing got done this evening, with my primary focus being on the fuel filler section.
The challenge here was to get a good sense of depth as everything sinks back from the main bodywork. I had to use many gradients to get the depth right, while also dealing with brushed metal surfaces and plastic.
An individual symbol was created for the outer elements, made up of about 10 different gradients. This was then duplicated 7 times and placed around the circular section.
The next stage is to apply lighting to all of the body panels. There are many elements to this car but fortunately most of the panels are flat or slightly curved; no twisted shapes like on the Jordan 191.
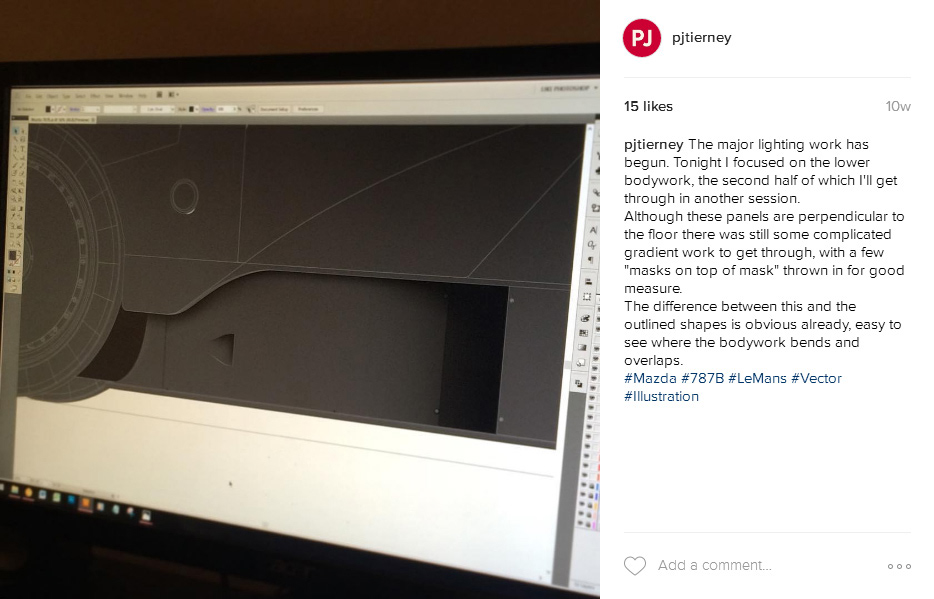
The major lighting work has begun.
Tonight I focused on the lower bodywork, the second half of which I'll get through in another session.
Although these panels are perpendicular to the floor there was still some complicated gradient work to get through, with a few "masks on top of mask" thrown in for good measure.
The difference between this and the outlined shapes is obvious already, easy to see where the bodywork bends and overlaps.
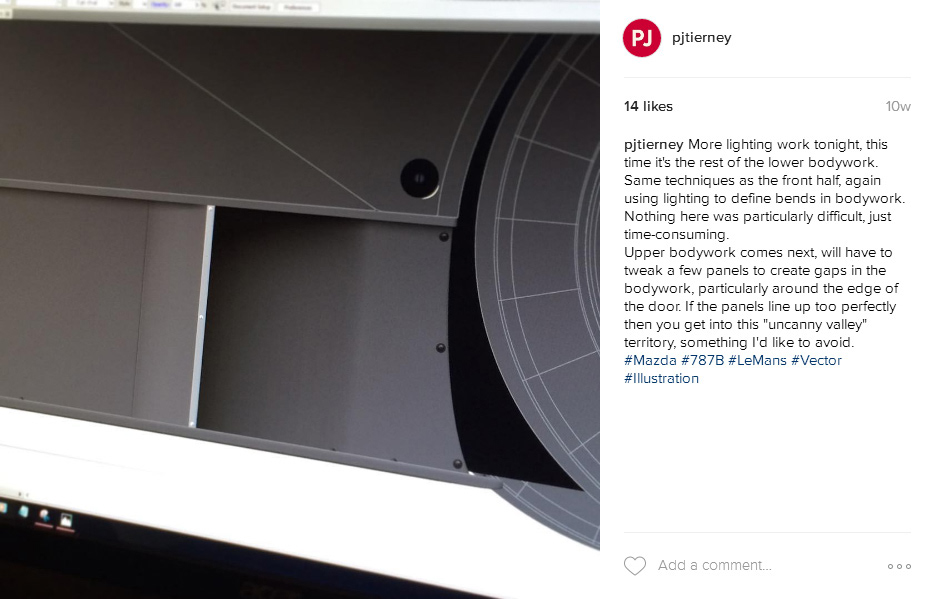
More lighting work tonight, this time it's the rest of the lower bodywork.
Same techniques as the front half, again using lighting to define bends in bodywork.
Nothing here was particularly difficult, just time-consuming.
Upper bodywork comes next, will have to tweak a few panels to create gaps in the bodywork, particularly around the edge of the door. If the panels line up too perfectly then you get into this "uncanny valley" territory, something I'd like to avoid.
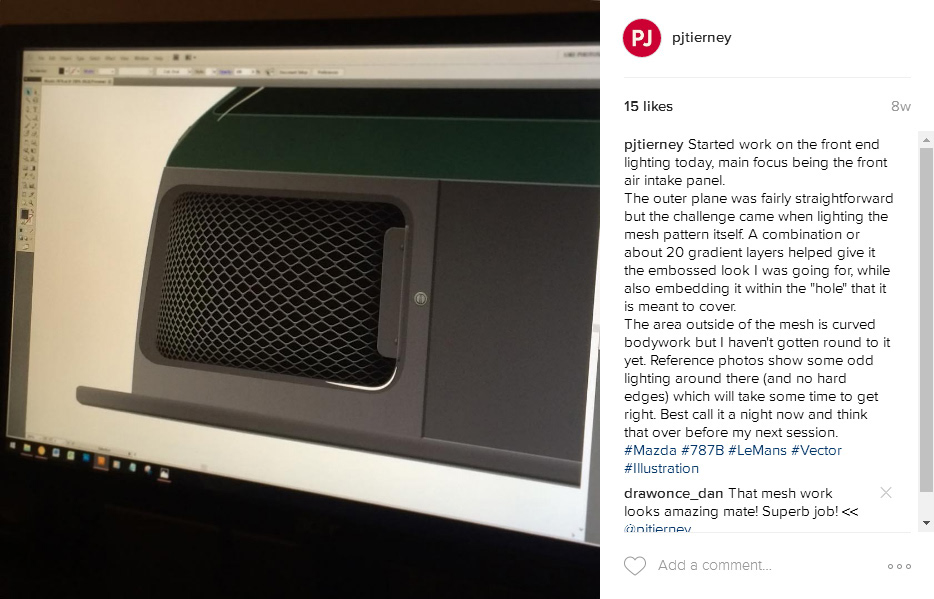
Started work on the front end lighting today, main focus being the front air intake panel.
The outer plane was fairly straightforward but the challenge came when lighting the mesh pattern itself. A combination or about 20 gradient layers helped give it the embossed look I was going for, while also embedding it within the "hole" that it is meant to cover.
The area outside of the mesh is curved bodywork but I haven't gotten round to it yet. Reference photos show some odd lighting around there (and no hard edges) which will take some time to get right. Best call it a night now and think that over before my next session.

Following on from yesterday's work, the bodywork surrounding the front air intake is complete.
I started with a gradient mesh which I would then turn into an opacity mask. This would ensure that the edges would fade in transparency, keeping the edges of my lighting effects consistent with one another.
The majority of the gradients used needed an opacity mask (a mask within a mask; that's like... 2 masks) which consisted of 2-3 gradients of its own.
The overall result is about 30 separate gradients, combined into 6 opacity masks, all contained within a meshed opacity mask. It's not perfect (concave surfaces are a pain to get right) but it will do.
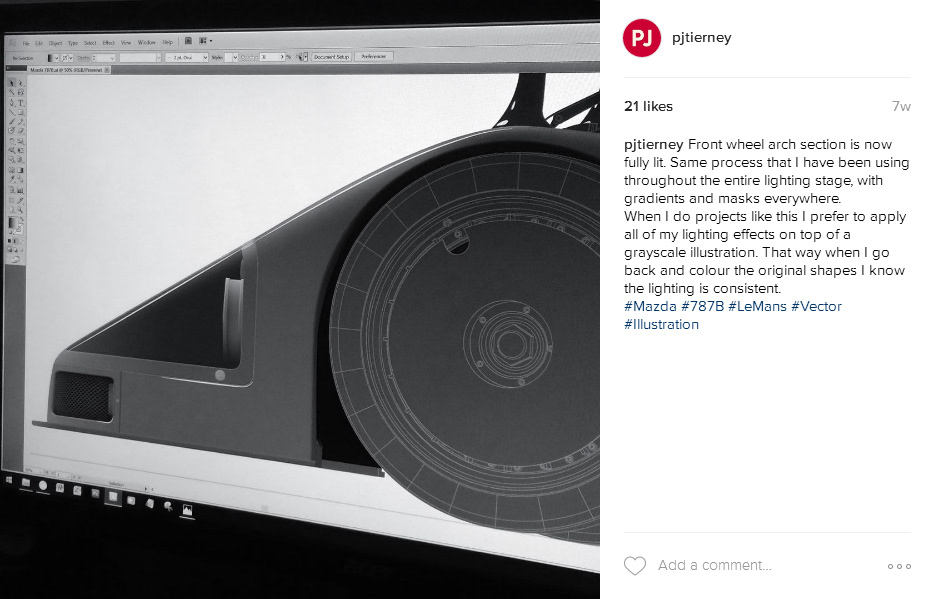
Front wheel arch section is now fully lit.
Same process that I have been using throughout the entire lighting stage, with gradients and masks everywhere.
When I do projects like this I prefer to apply all of my lighting effects on top of a grayscale illustration.
That way when I go back and colour the original shapes I know the lighting is consistent.
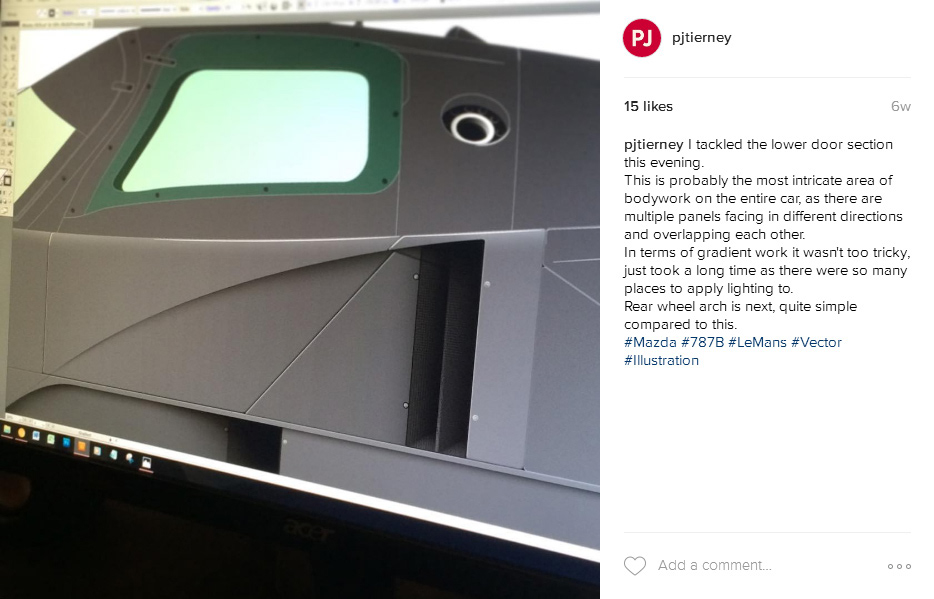
I tackled the lower door section this evening.
This is probably the most intricate area of bodywork on the entire car, as there are multiple panels facing in different directions and overlapping each other.
In terms of gradient work it wasn't too tricky, just took a long time as there were so many places to apply lighting to.
Rear wheel arch is next, quite simple compared to this.
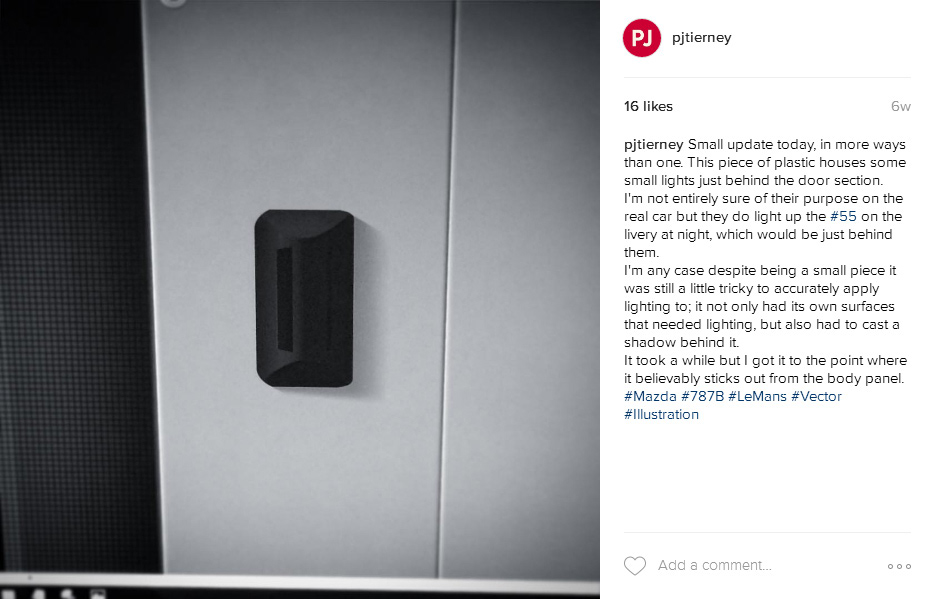
Small update today, in more ways than one.
This piece of plastic houses some small lights just behind the door section.
I'm not entirely sure of their purpose on the real car but they do light up the #55 on the livery at night, which would be just behind them. In any case despite being a small piece it was still a little tricky to accurately apply lighting to; it not only had its own surfaces that needed lighting, but also had to cast a shadow behind it.
It took a while but I got it to the point where it believably sticks out from the body panel.
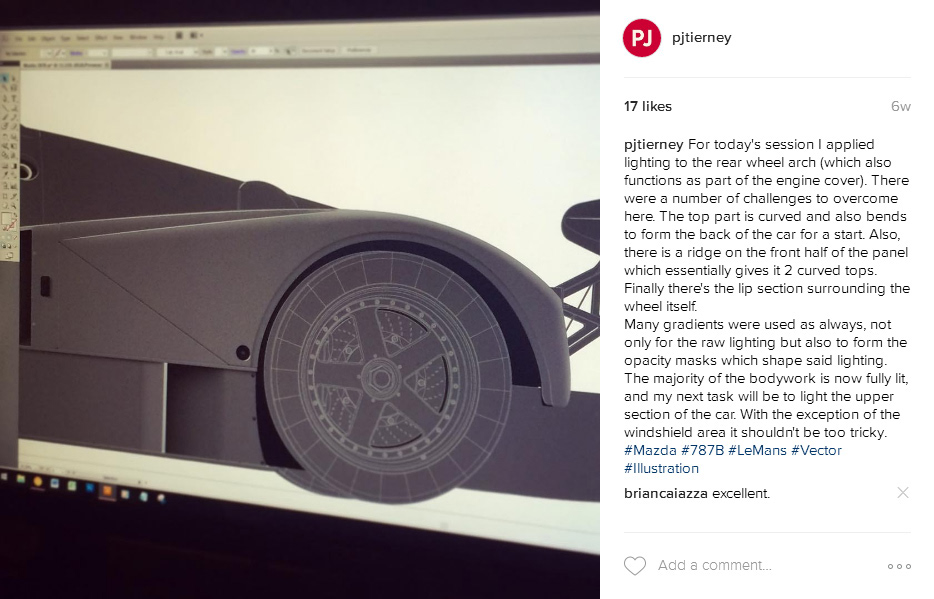
For today's session I applied lighting to the rear wheel arch (which also functions as part of the engine cover).
There were a number of challenges to overcome here. The top part is curved and also bends to form the back of the car for a start.
Also, there is a ridge on the front half of the panel which essentially gives it 2 curved tops.
Finally there's the lip section surrounding the wheel itself.
Many gradients were used as always, not only for the raw lighting but also to form the opacity masks which shape said lighting.
The majority of the bodywork is now fully lit, and my next task will be to light the upper section of the car.
With the exception of the windshield area it shouldn't be too tricky.
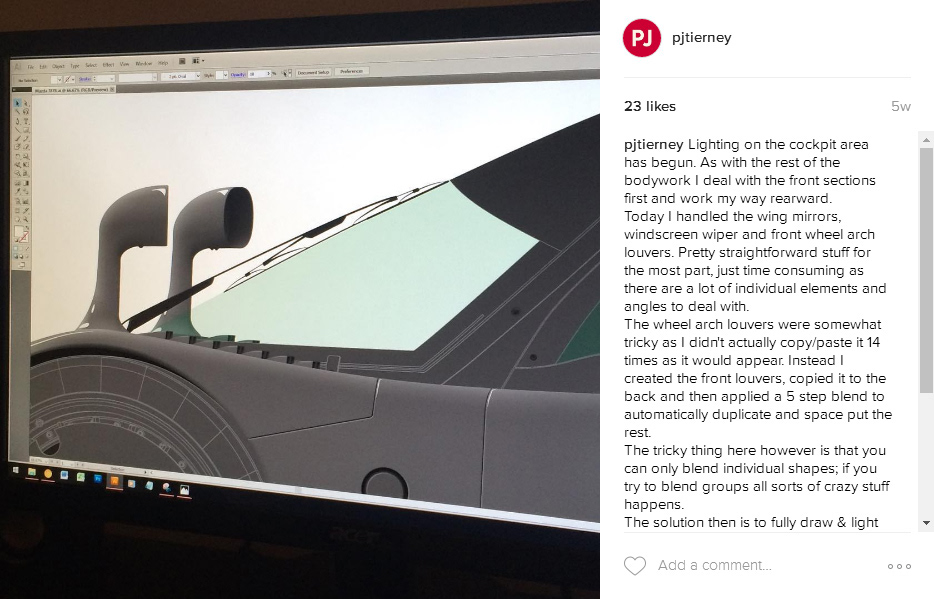
Lighting on the cockpit area has begun. As with the rest of the bodywork I deal with the front sections first and work my way rearward.
Today I handled the wing mirrors, windscreen wiper and front wheel arch louvers. Pretty straightforward stuff for the most part, just time consuming as there are a lot of individual elements and angles to deal with.
The wheel arch louvers were somewhat tricky as I didn't actually copy/paste it 14 times as it would appear. Instead I created the front louvers, copied it to the back and then applied a 5 step blend to automatically duplicate and space put the rest.
The tricky thing here however is that you can only blend individual shapes; if you try to blend groups all sorts of crazy stuff happens.
The solution then is to fully draw & light one piece and then merge it into a symbol. @adobe Illustrator then thinks that symbol is a single layer and then blends accordingly.
That's what I like about projects like this, many small tools, skills and tricks combine to make something that's greater than the sum of their parts.

Today I tackled the windshield, a complicated set of components with several different surface types.
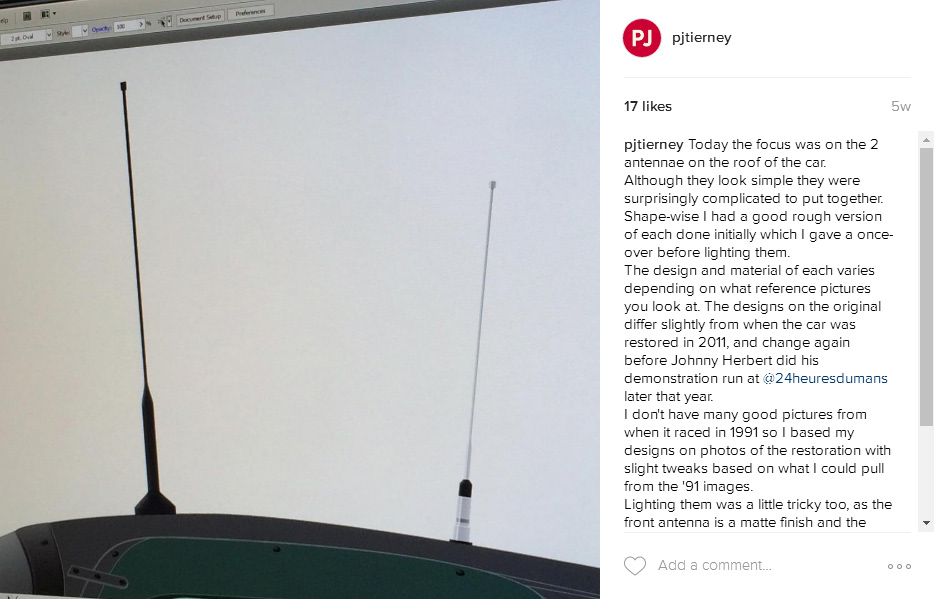
Today the focus was on the 2 antennae on the roof of the car.
Although they look simple they were surprisingly complicated to put together. Shape-wise I had a good rough version of each done initially which I gave a once-over before lighting them.
The design and material of each varies depending on what reference pictures you look at.
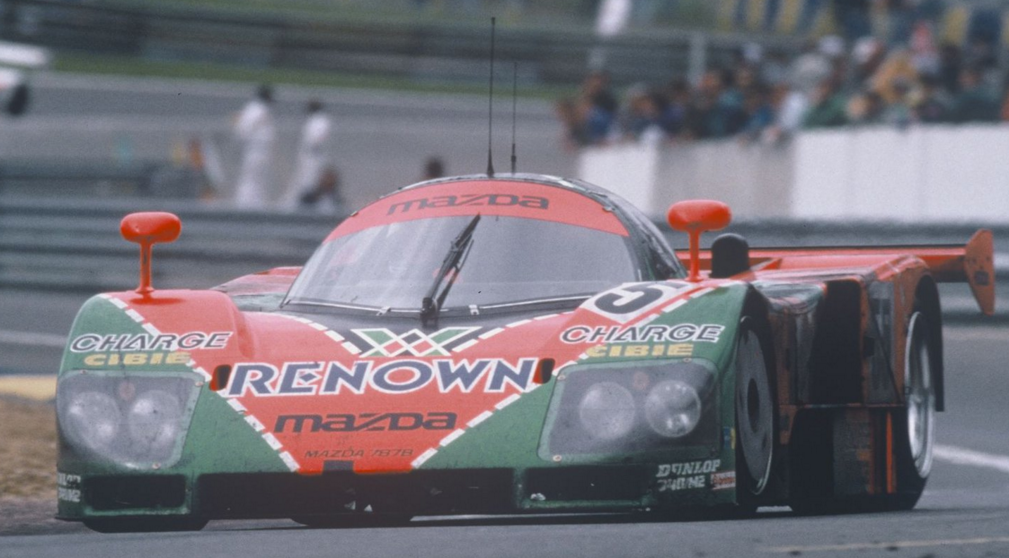
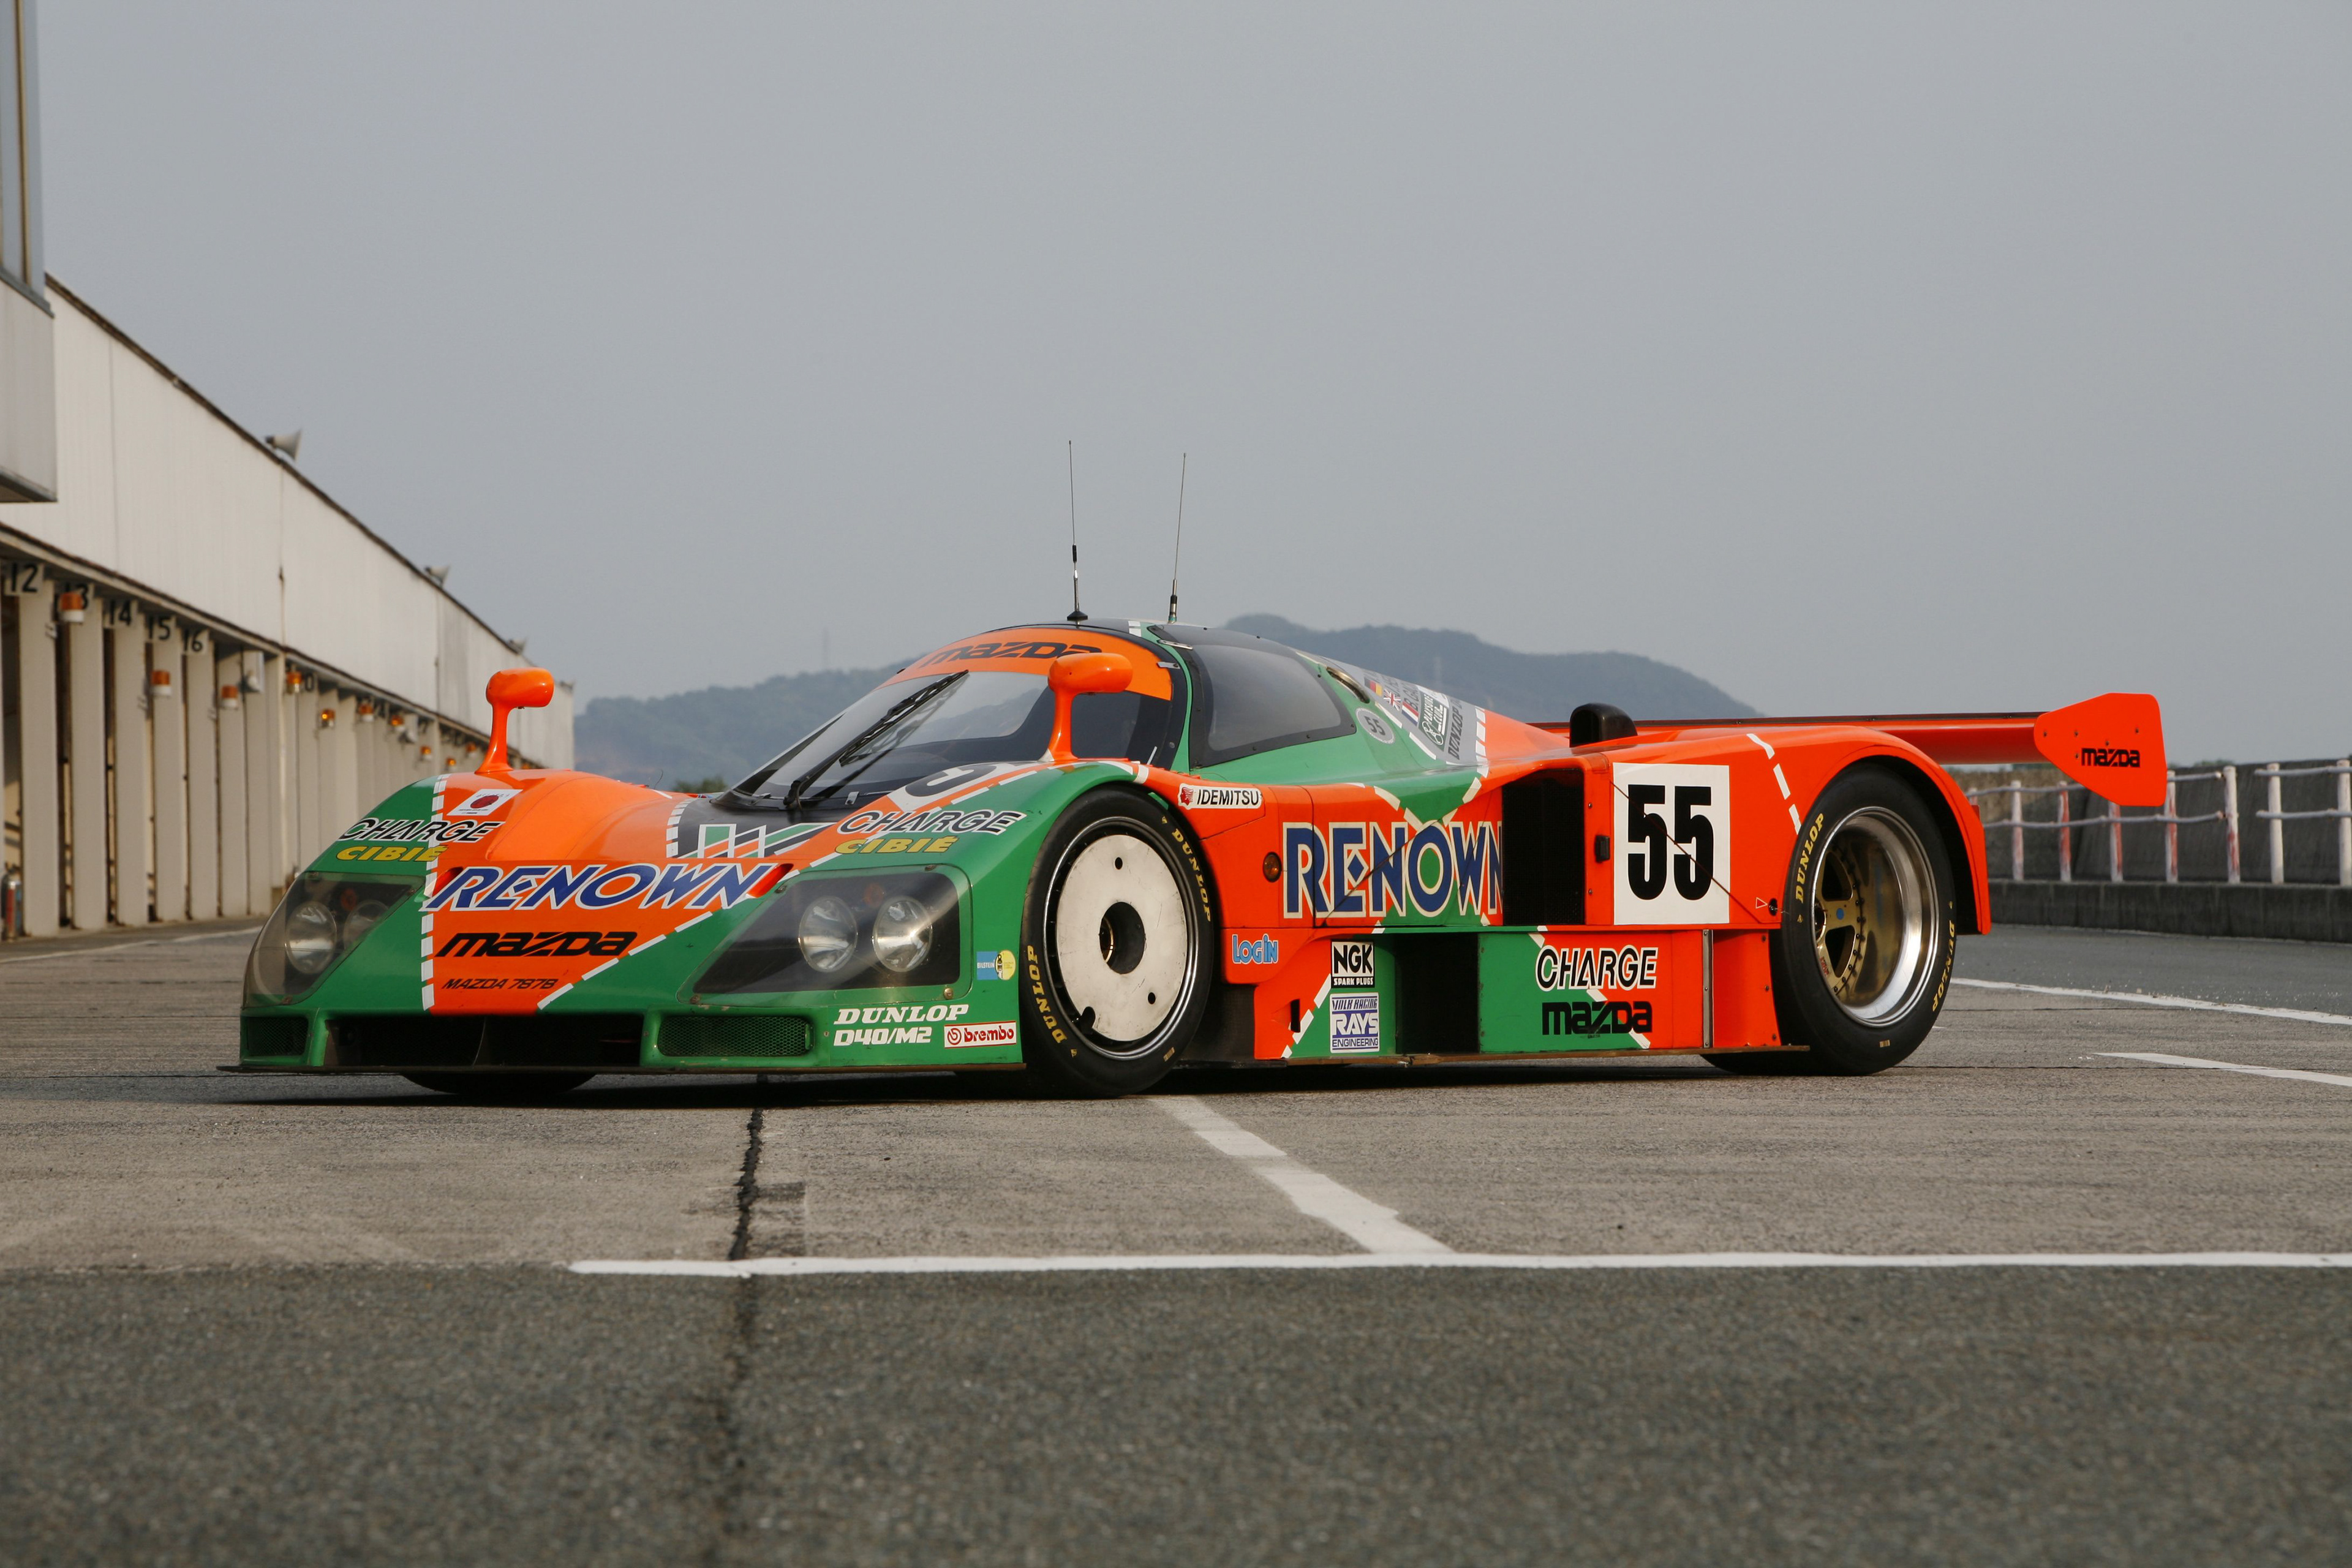
The designs on the original differ slightly from when the car was restored in 2011, and change again before Johnny Herbert did his demonstration run at @24heuresdumans later that year.
I don't have many good pictures from when it raced in 1991 so I based my designs on photos of the restoration with slight tweaks based on what I could pull from the '91 images.
Lighting them was a little tricky too, as the front antenna is a matte finish and the back is almost like chrome. Add in the fact that these are very narrow cylinders and you can see why they took a few hours to get right.
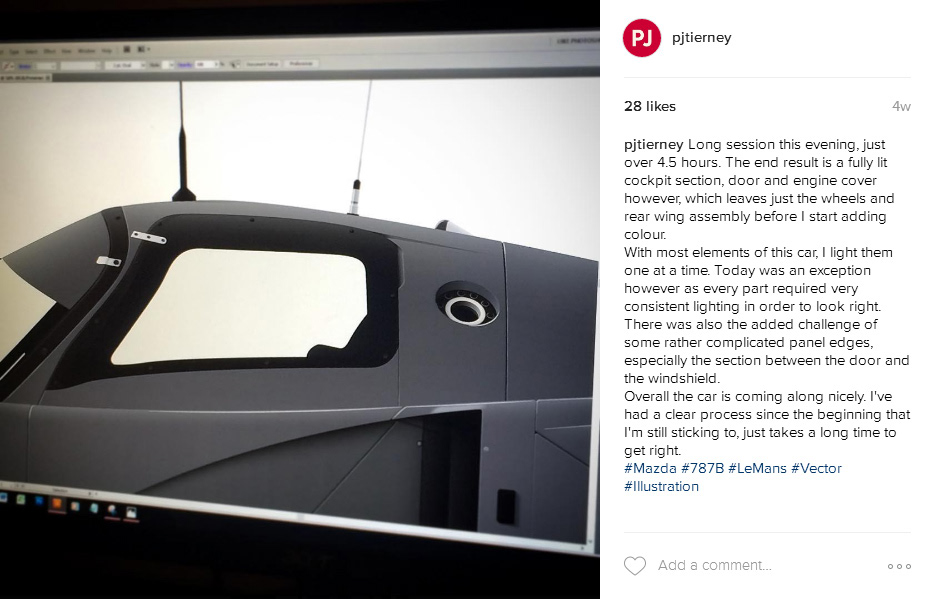
Long session this evening, just over 4.5 hours.
The end result is a fully lit cockpit section, door and engine cover however, which leaves just the wheels and rear wing assembly before I start adding colour.
With most elements of this car, I light them one at a time. Today was an exception however as every part required very consistent lighting in order to look right.
There was also the added challenge of some rather complicated panel edges, especially the section between the door and the windshield.
Overall the car is coming along nicely. I've had a clear process since the beginning that I'm still sticking to, just takes a long time to get right.
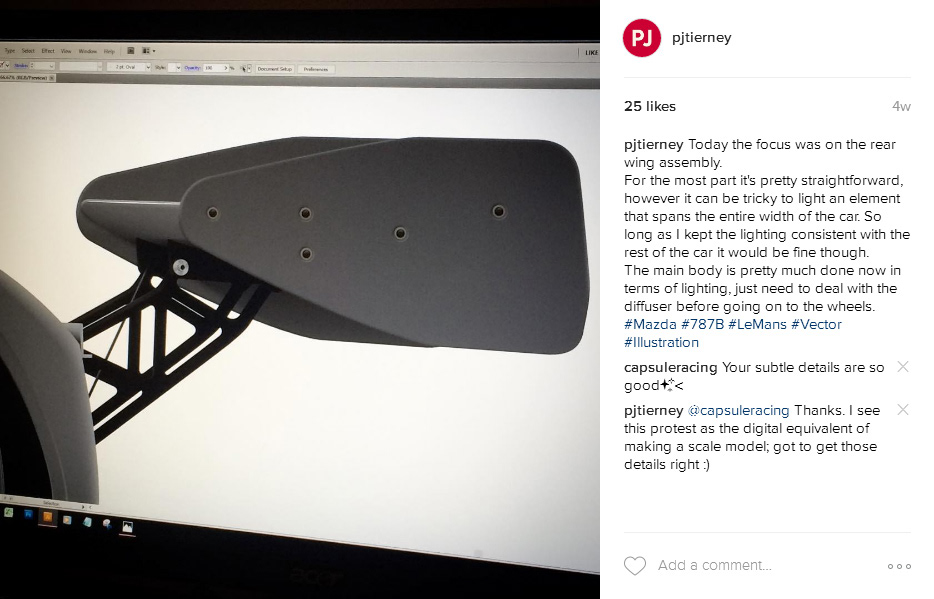
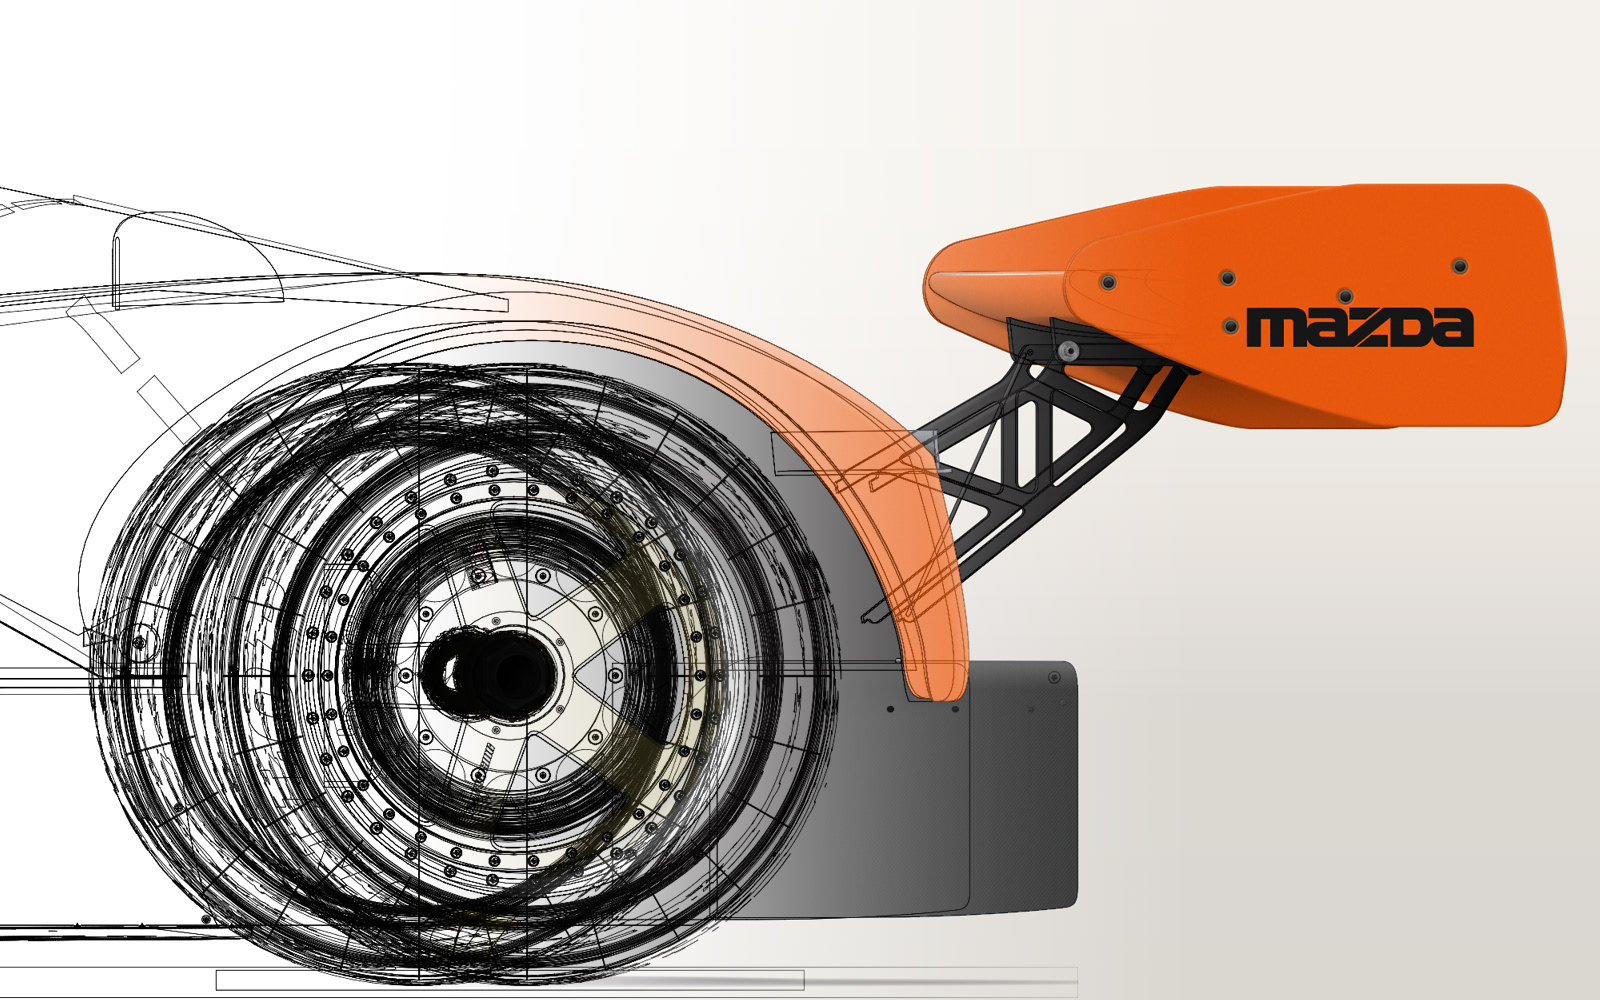
Today the focus was on the rear wing assembly.
For the most part it's pretty straightforward, however it can be tricky to light an element that spans the entire width of the car. So long as I kept the lighting consistent with the rest of the car it would be fine though.
The main body is pretty much done now in terms of lighting, just need to deal with the diffuser before going on to the wheels.
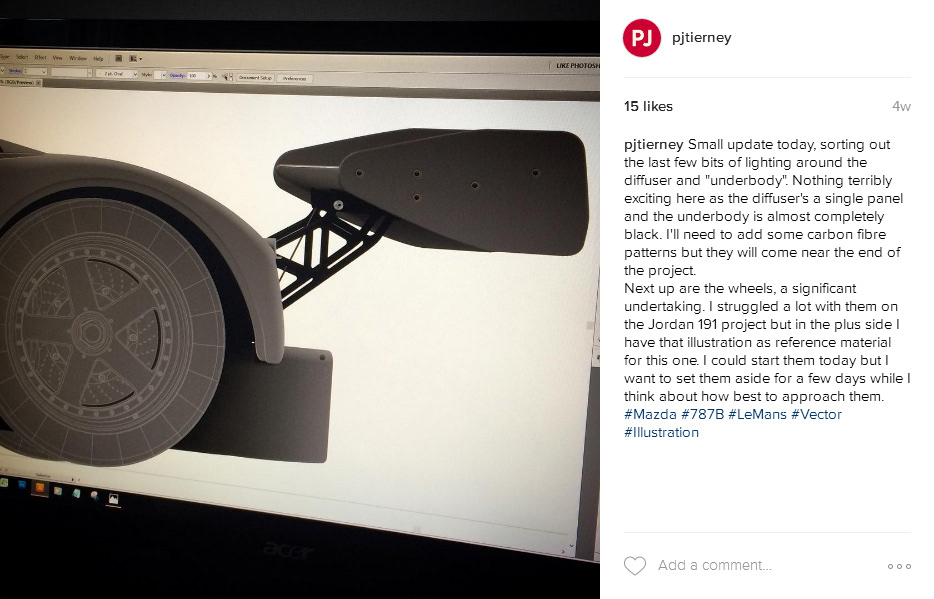
Small update today, sorting out the last few bits of lighting around the diffuser and "underbody".
Nothing terribly exciting here as the diffuser's a single panel and the underbody is almost completely black. I'll need to add some carbon fibre patterns but they will come near the end of the project.
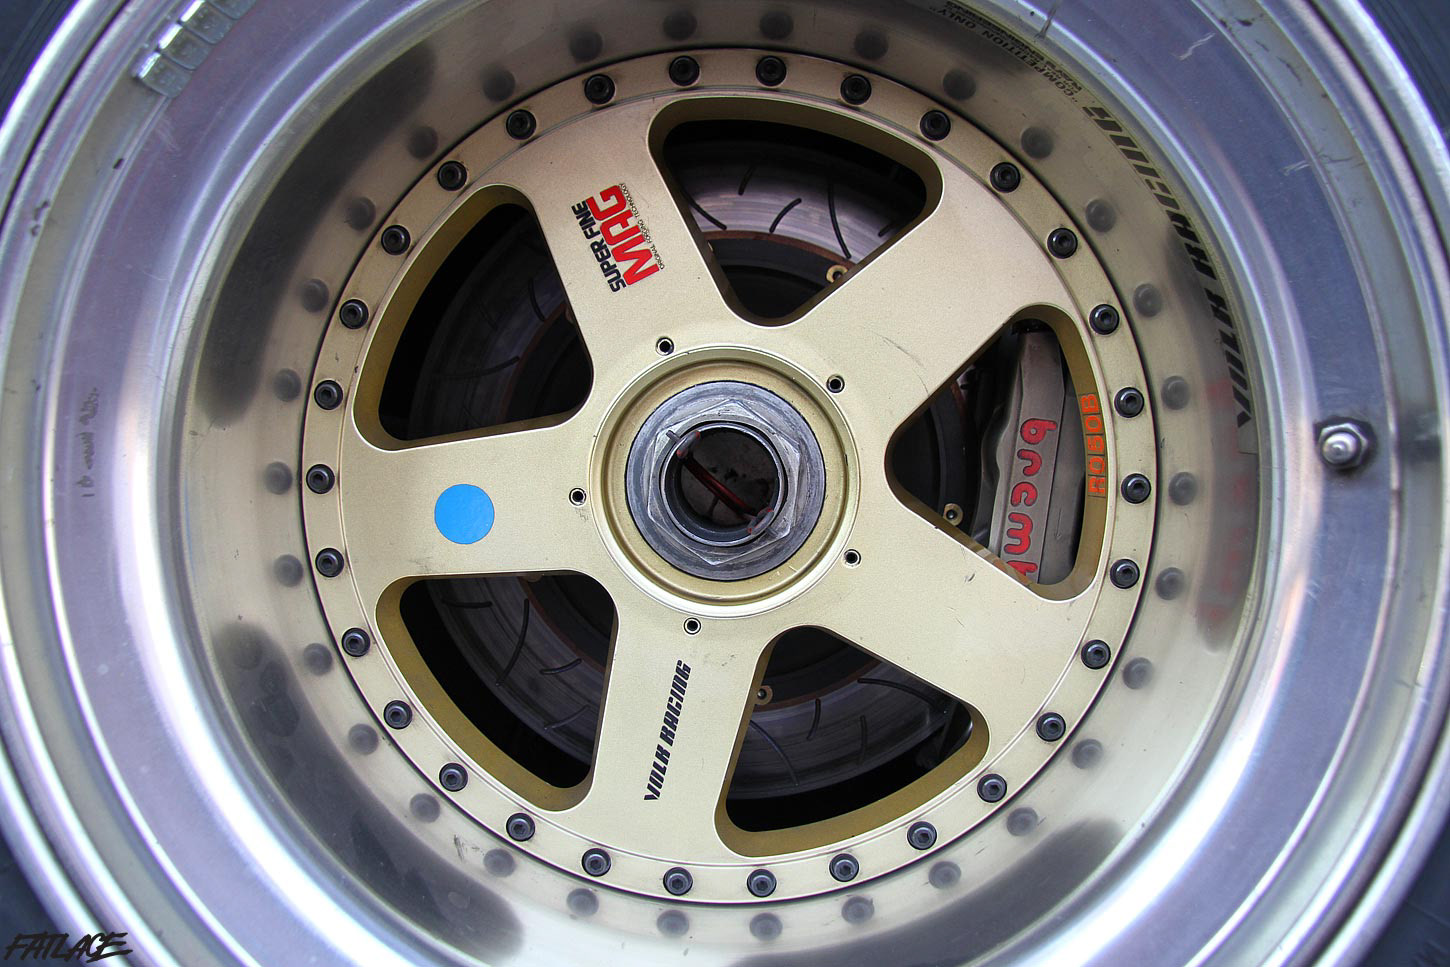
Next up are the wheels, a significant undertaking. I struggled a lot with them on the Jordan 191 project but in the plus side I have that illustration as reference material for this one.
I could start them today but I want to set them aside for a few days while I think about how best to approach them.
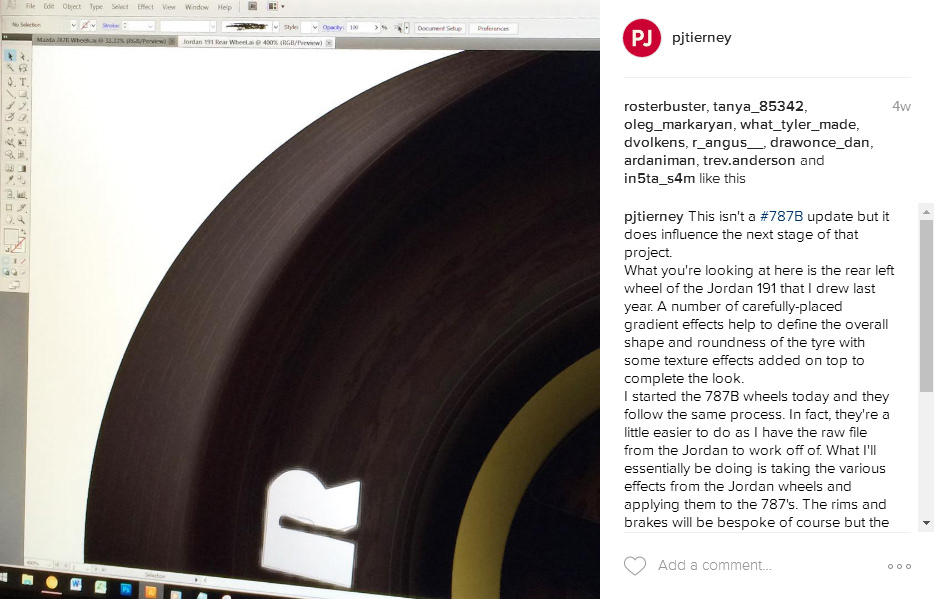
This isn't a #787B update but it does influence the next stage of that project.
What you're looking at here is the rear left wheel of the Jordan 191 that I drew last year.
A number of carefully-placed gradient effects help to define the overall shape and roundness of the tyre with some texture effects added on top to complete the look.
I started the 787B wheels today and they follow the same process. In fact, they're a little easier to do as I have the raw file from the Jordan to work off of.
What I'll essentially be doing is taking the various effects from the Jordan wheels and applying them to the 787's. The rims and brakes will be bespoke of course but the rubber carries over.
This is a big timesaver and a good example of elements from previous projects having an influence on current ones.
Today was more of a planning and foundation work day, hence why I've not got much new to show from the 787 model. Naturally, once the wheels are making notable progress I'll share another pic.
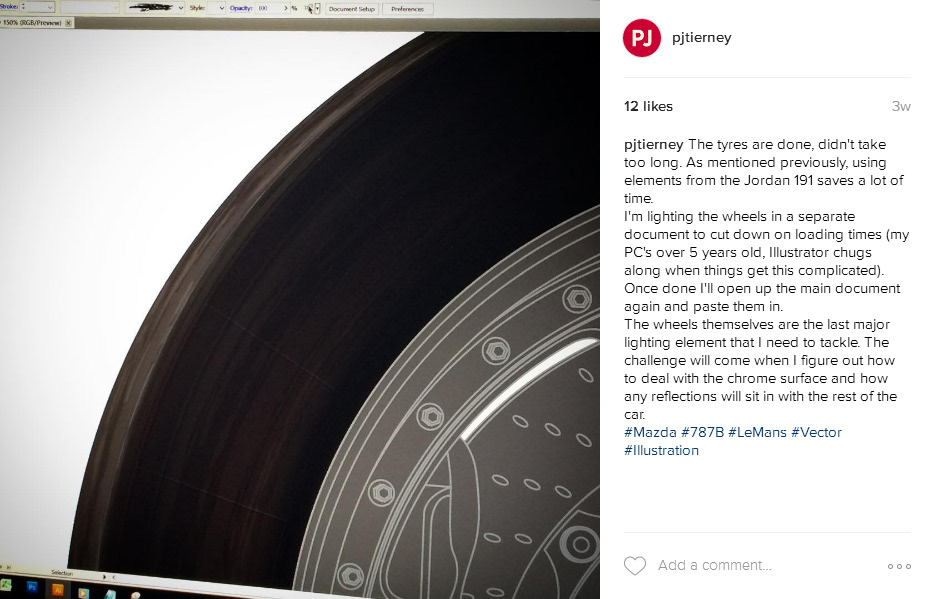
The tyres are done, didn't take too long. As mentioned previously, using elements from the Jordan 191 saves a lot of time.
I'm lighting the wheels in a separate document to cut down on loading times (my PC's over 5 years old, Illustrator chugs along when things get this complicated).
Once done I'll open up the main document again and paste them in.
The wheels themselves are the last major lighting element that I need to tackle. The challenge will come when I figure out how to deal with the chrome surface and how any reflections will sit in with the rest of the car.
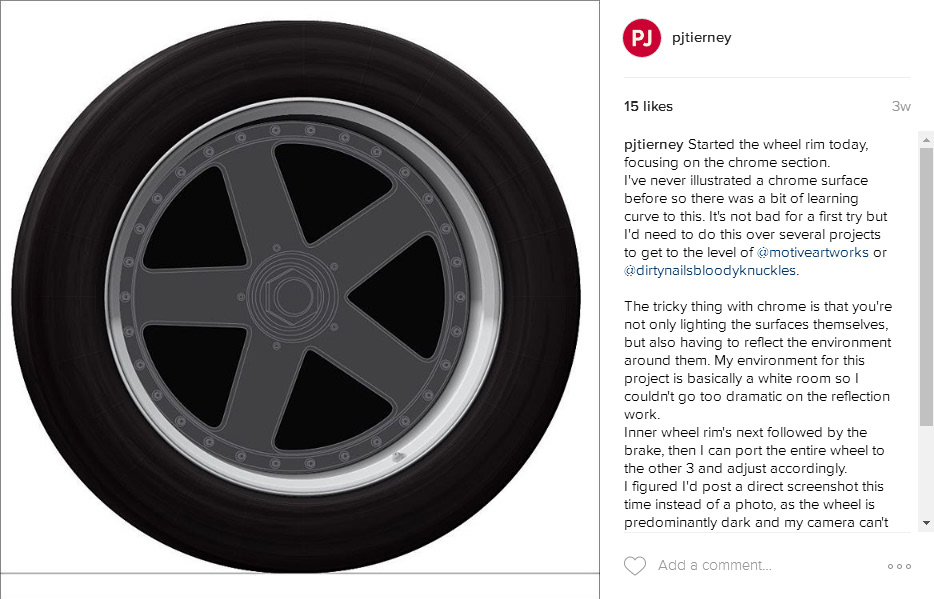
Started the wheel rim today, focusing on the chrome section. I've never illustrated a chrome surface before so there was a bit of learning curve to this.
It's not bad for a first try but I'd need to do this over several projects to get to the level of @motiveartworks or @dirtynailsbloodyknuckles.
The tricky thing with chrome is that you're not only lighting the surfaces themselves, but also having to reflect the environment around them.
My environment for this project is basically a white room so I couldn't go too dramatic on the reflection work.
Inner wheel rim's next followed by the brake, then I can port the entire wheel to the other 3 and adjust accordingly.
I figured I'd post a direct screenshot this time instead of a photo, as the wheel is predominantly dark and my camera can't pick up low light illustration work all that well.
I like the feel of off-screen images but in this case the detail was more important to show off.
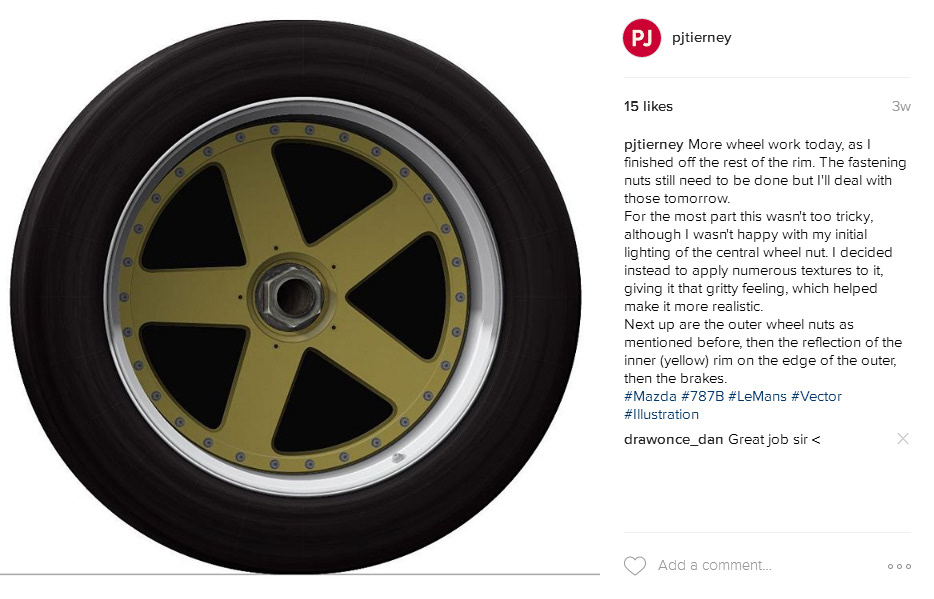
More wheel work today, as I finished off the rest of the rim. The fastening nuts still need to be done but I'll deal with those tomorrow.
For the most part this wasn't too tricky, although I wasn't happy with my initial lighting of the central wheel nut. I decided instead to apply numerous textures to it, giving it that gritty feeling, which helped make it more realistic.
Next up are the outer wheel nuts as mentioned before, then the reflection of the inner (yellow) rim on the edge of the outer, then the brakes.
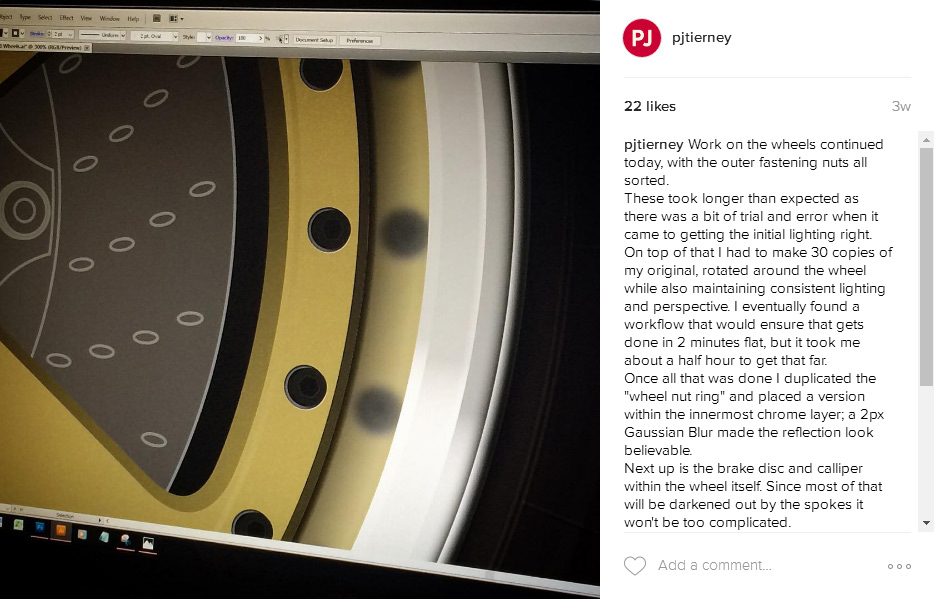
Work on the wheels continued today, with the outer fastening nuts all sorted.
These took longer than expected as there was a bit of trial and error when it came to getting the initial lighting right.
On top of that I had to make 30 copies of my original, rotated around the wheel while also maintaining consistent lighting and perspective.
I eventually found a workflow that would ensure that gets done in 2 minutes flat, but it took me about a half hour to get that far.
Once all that was done I duplicated the "wheel nut ring" and placed a version within the innermost chrome layer; a 2px Gaussian Blur made the reflection look believable.
Next up is the brake disc and calliper within the wheel itself. Since most of that will be darkened out by the spokes it won't be too complicated.
I knew going into this project that the wheels would be complicated enough to become a project of their own; they've taken over a dozen hours to get right so far but I'm nearing the end.
Once done they go back in to the main illustration where another lighting pass will have them sitting nicely under the bodywork of the car.
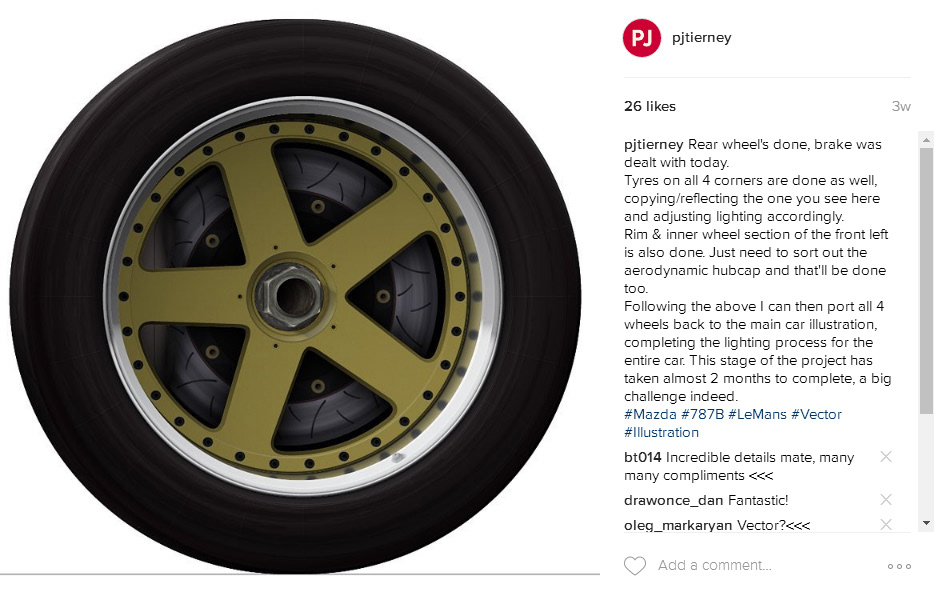
Rear wheel's done, brake was dealt with today. Tyres on all 4 corners are done as well, copying/reflecting the one you see here and adjusting lighting accordingly.
Rim & inner wheel section of the front left is also done. Just need to sort out the aerodynamic hubcap and that'll be done too.
Following the above I can then port all 4 wheels back to the main car illustration, completing the lighting process for the entire car. This stage of the project has taken almost 2 months to complete, a big challenge indeed.
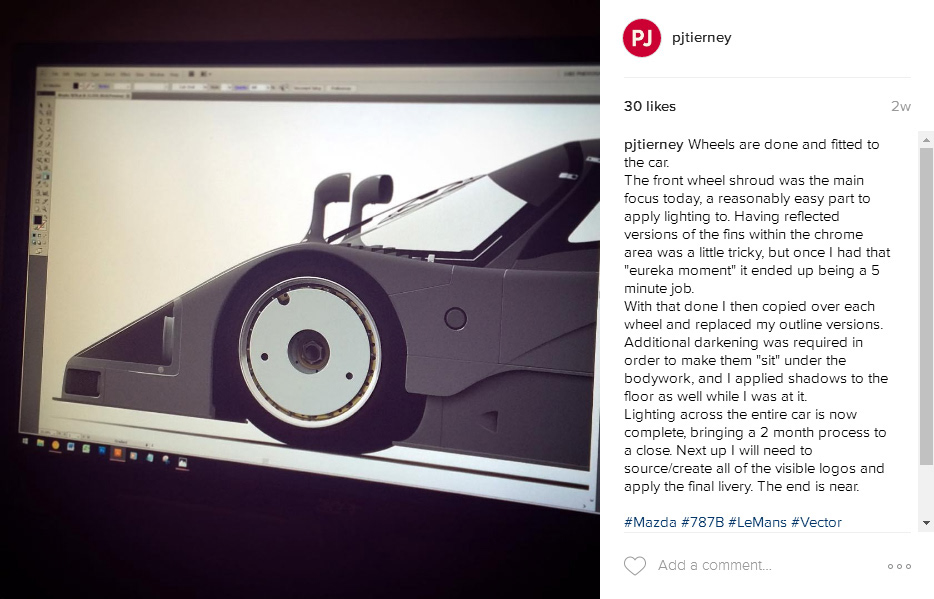
Wheels are done and fitted to the car.
The front wheel shroud was the main focus today, a reasonably easy part to apply lighting to. Having reflected versions of the fins within the chrome area was a little tricky, but once I had that "eureka moment" it ended up being a 5 minute job.
With that done I then copied over each wheel and replaced my outline versions. Additional darkening was required in order to make them "sit" under the bodywork, and I applied shadows to the floor as well while I was at it.
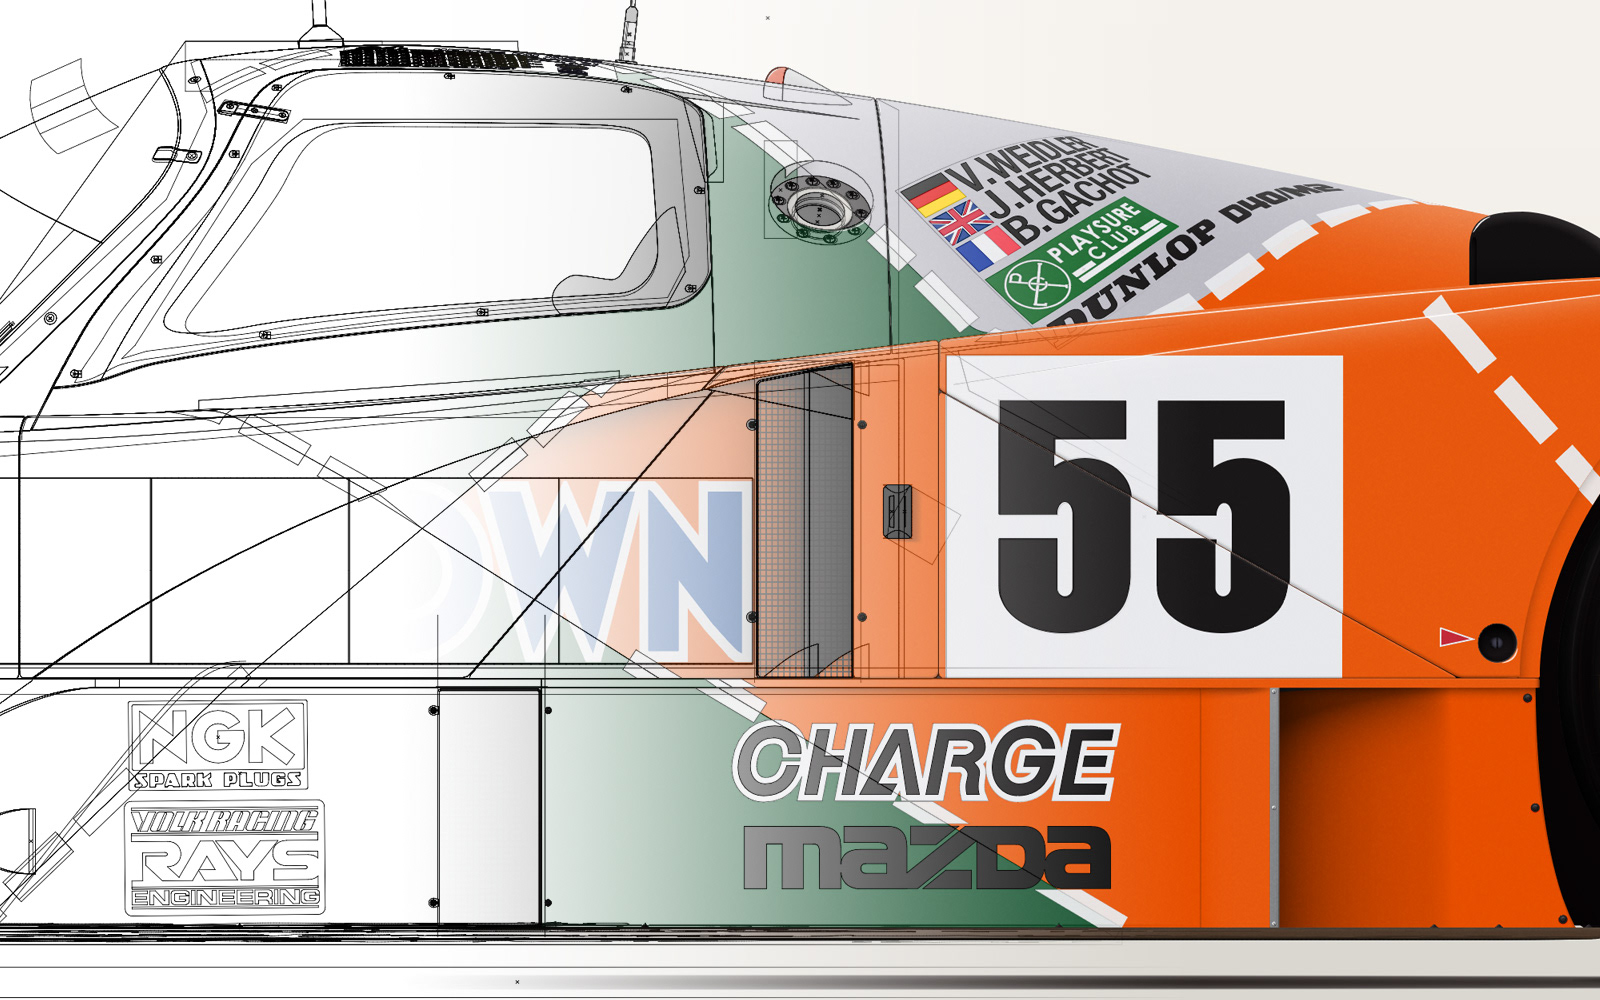
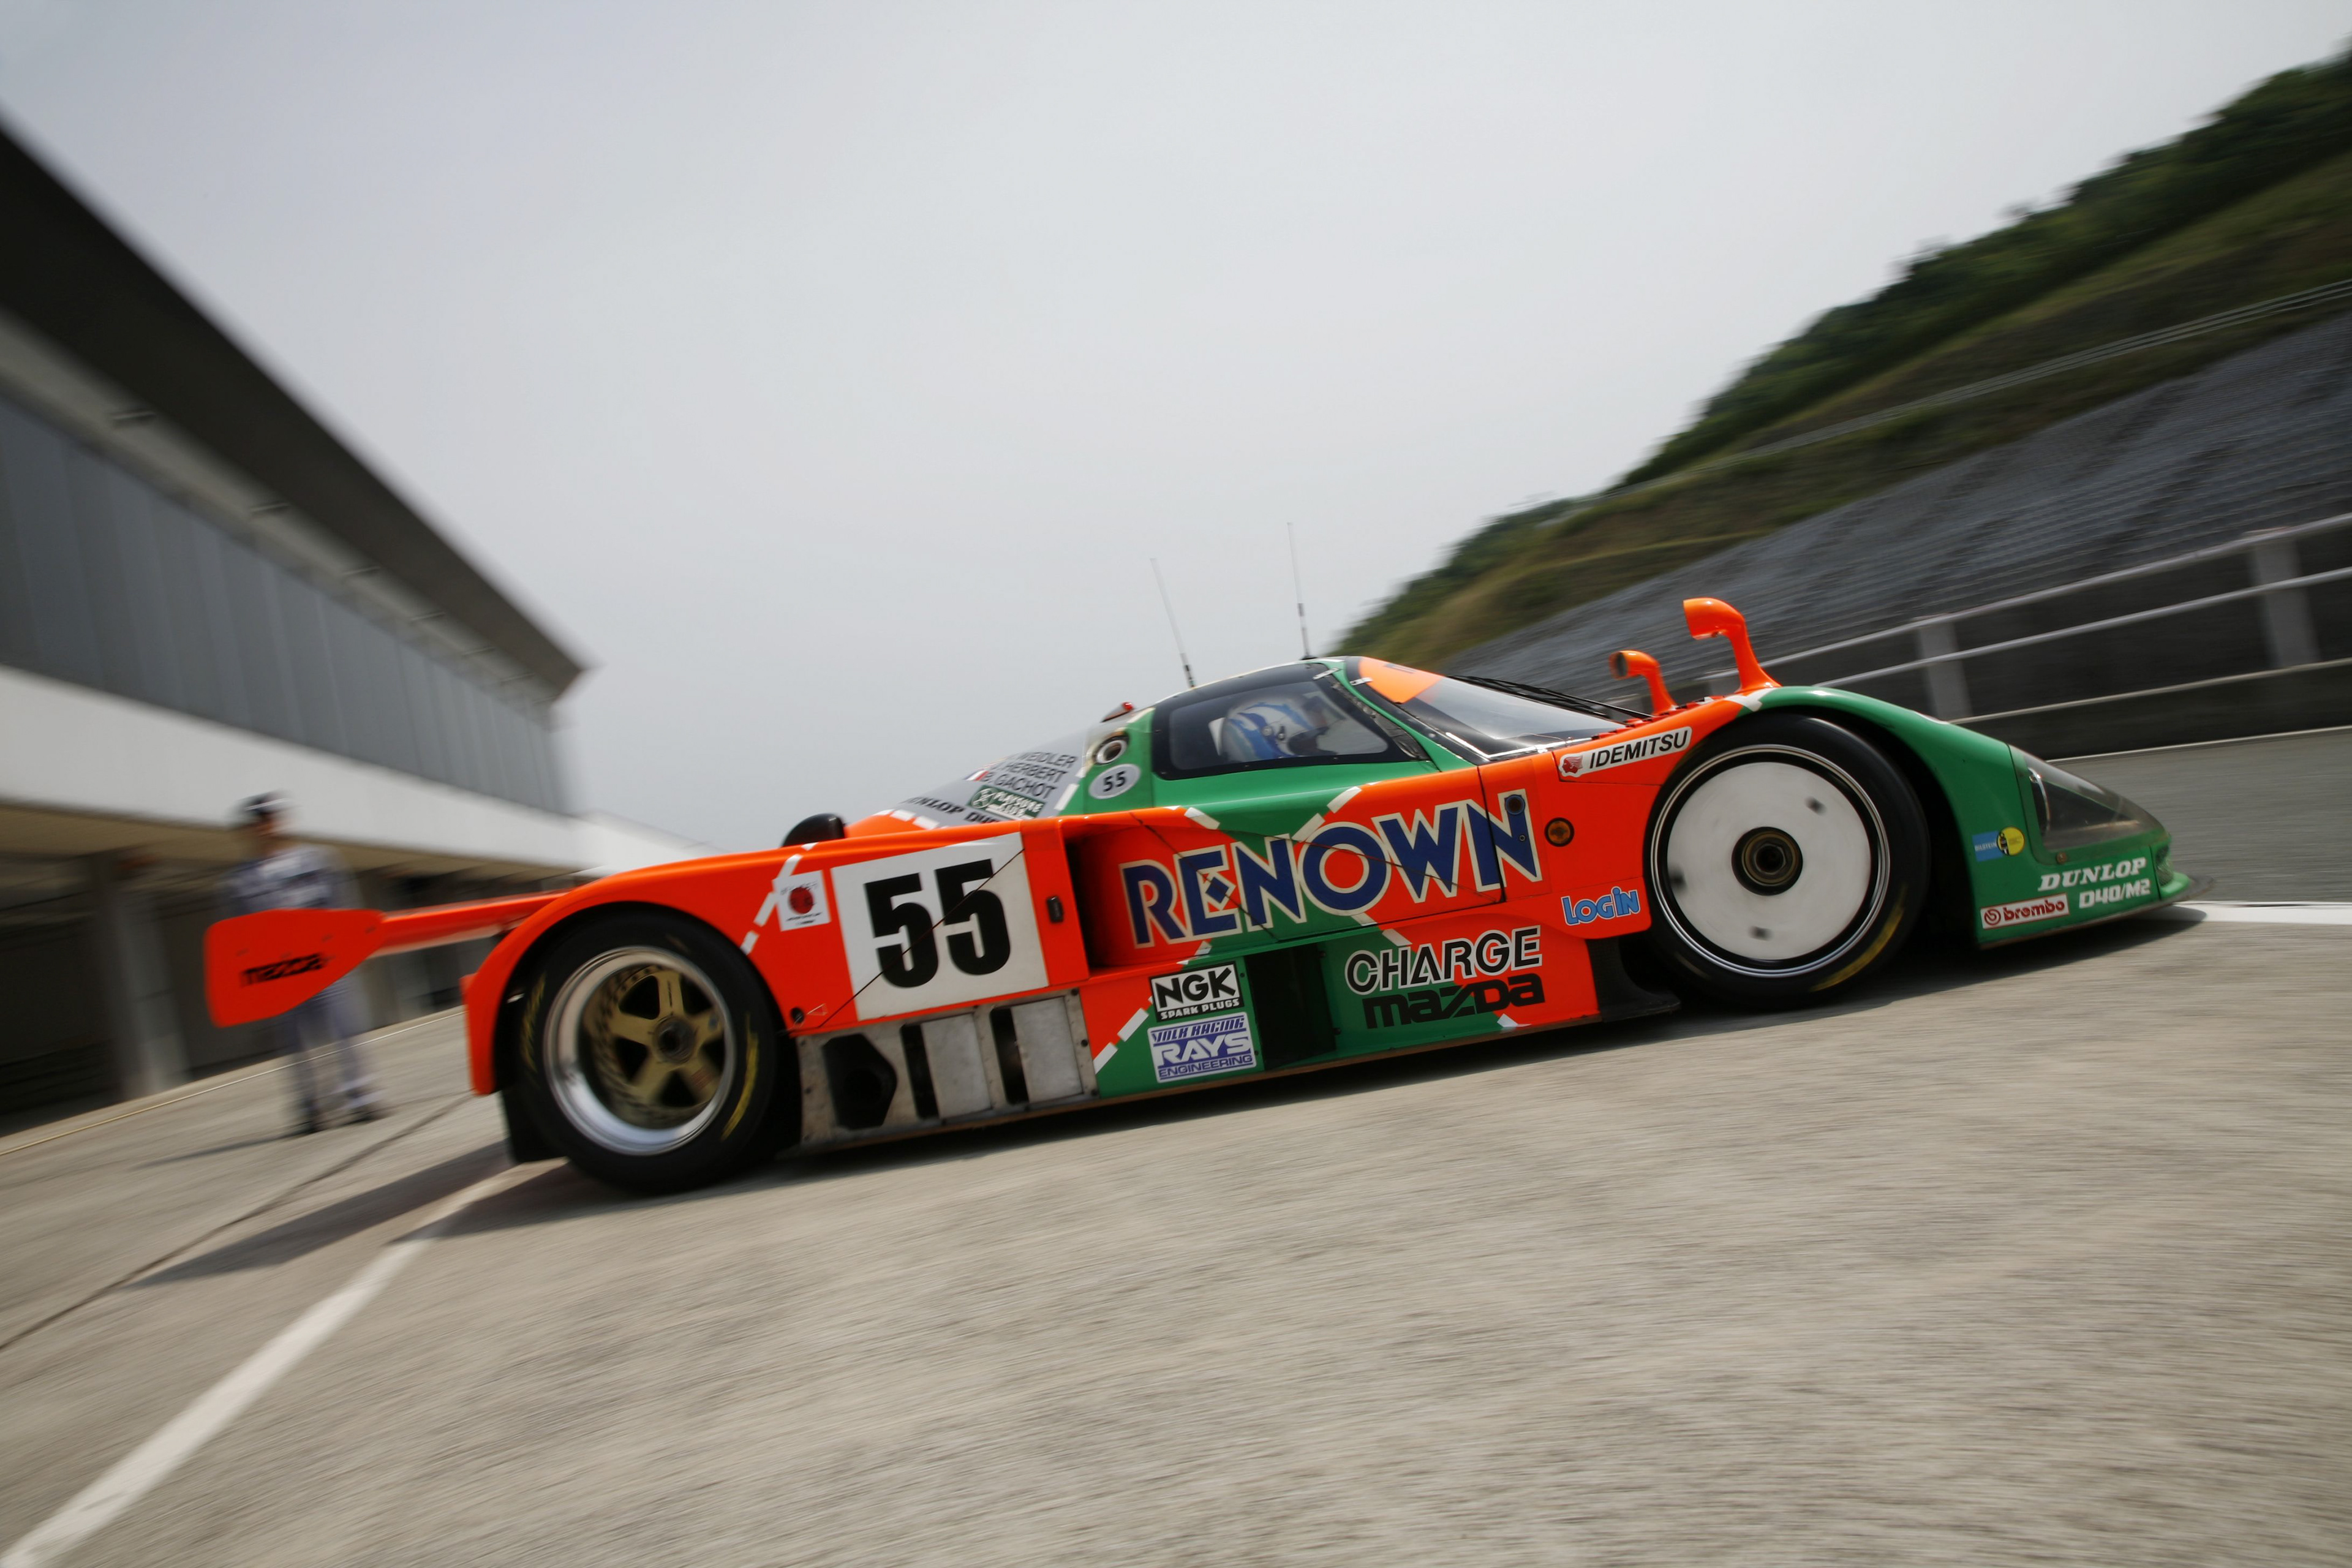
Lighting across the entire car is now complete, bringing a 2 month process to a close. Next up I will need to source/create all of the visible logos and apply the final livery. The end is near.
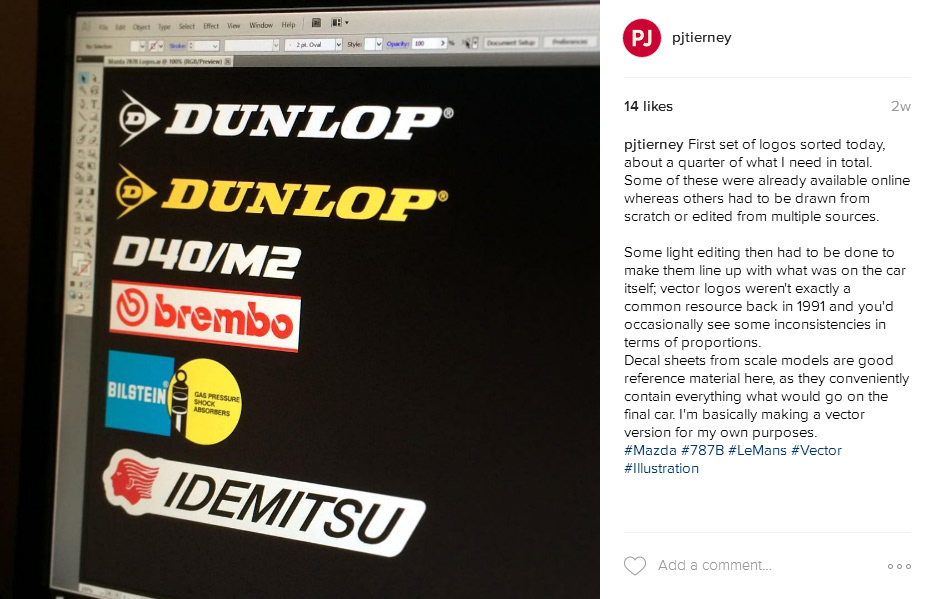
First set of logos sorted today, about a quarter of what I need in total.
Some of these were already available online whereas others had to be drawn from scratch or edited from multiple sources.
Some light editing then had to be done to make them line up with what was on the car itself; vector logos weren't exactly a common resource back in 1991 and you'd occasionally see some inconsistencies in terms of proportions.
Decal sheets from scale models are good reference material here, as they conveniently contain everything what would go on the final car. I'm basically making a vector version for my own purposes.
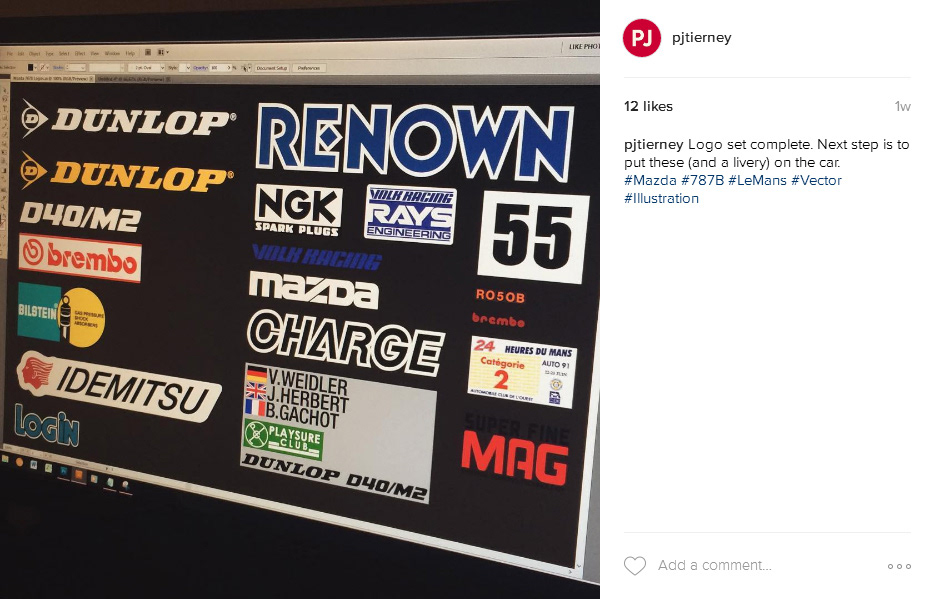
Logo set complete. Next step is to put these (and a livery) on the car.
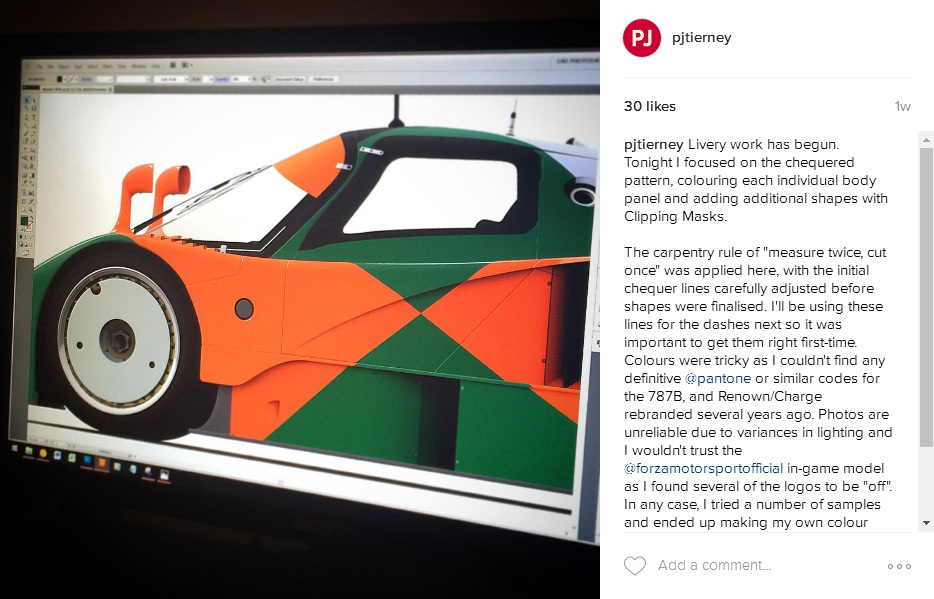
Livery work has begun. Tonight I focused on the chequered pattern, colouring each individual body panel and adding additional shapes with Clipping Masks.
The carpentry rule of "measure twice, cut once" was applied here, with the initial chequer lines carefully adjusted before shapes were finalised. I'll be using these lines for the dashes next so it was important to get them right first-time.
Colours were tricky as I couldn't find any definitive @pantone or similar codes for the 787B, and Renown/Charge rebranded several years ago.
Photos are unreliable due to variances in lighting and I wouldn't trust the @forzamotorsportofficial in-game model as I found several of the logos to be "off".
In any case, I tried a number of samples and ended up making my own colour codes; I may revisit them later on. Dashed line pattern next, then the logos.
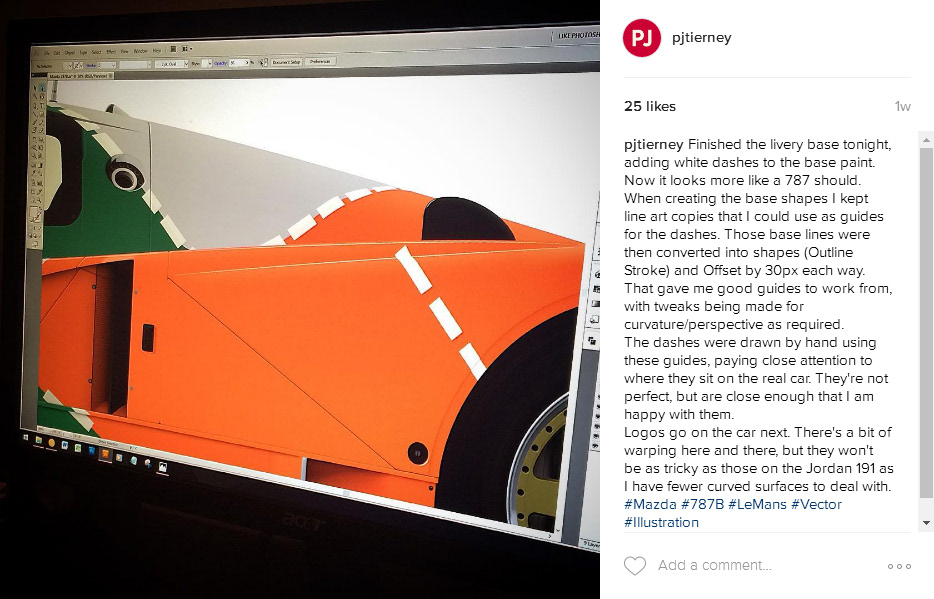
Finished the livery base tonight, adding white dashes to the base paint. Now it looks more like a 787 should.
When creating the base shapes I kept line art copies that I could use as guides for the dashes. Those base lines were then converted into shapes (Outline Stroke) and Offset by 30px each way.
That gave me good guides to work from, with tweaks being made for curvature/perspective as required.
The dashes were drawn by hand using these guides, paying close attention to where they sit on the real car. They're not perfect, but are close enough that I am happy with them.
Logos go on the car next. There's a bit of warping here and there, but they won't be as tricky as those on the Jordan 191 as I have fewer curved surfaces to deal with.
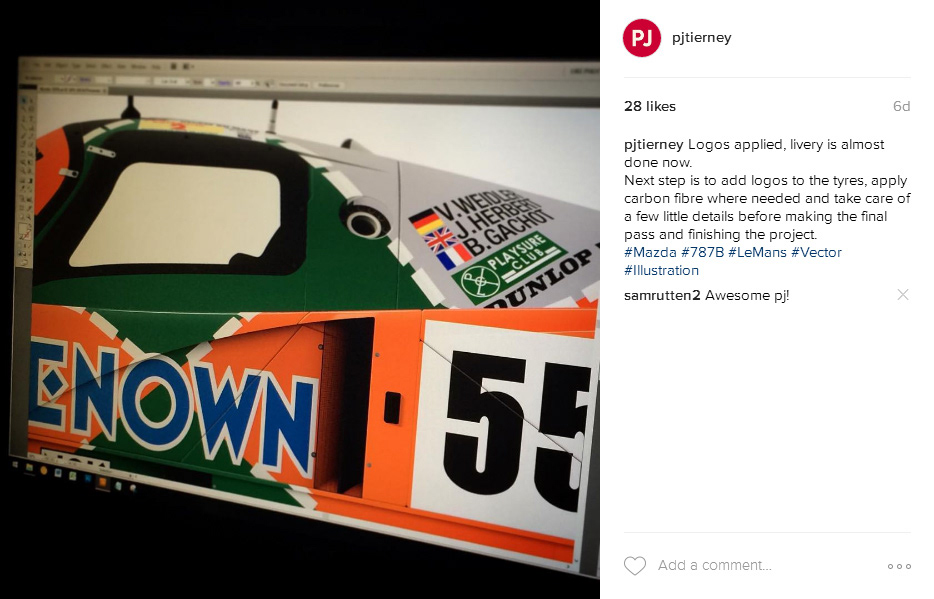
Logos applied, livery is almost done now.
Next step is to add logos to the tyres, apply carbon fibre where needed and take care of a few little details before making the final pass and finishing the project.
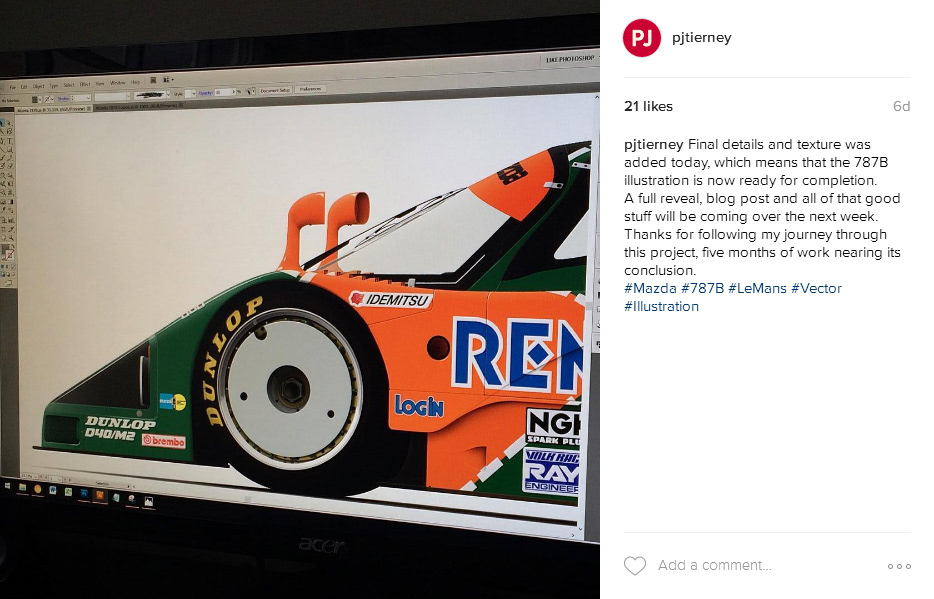
Final details and texture was added today, which means that the 787B illustration is now ready for completion.
A full reveal, blog post and all of that good stuff will be coming over the next week.
Thanks for following my journey through this project, five months of work nearing its conclusion.
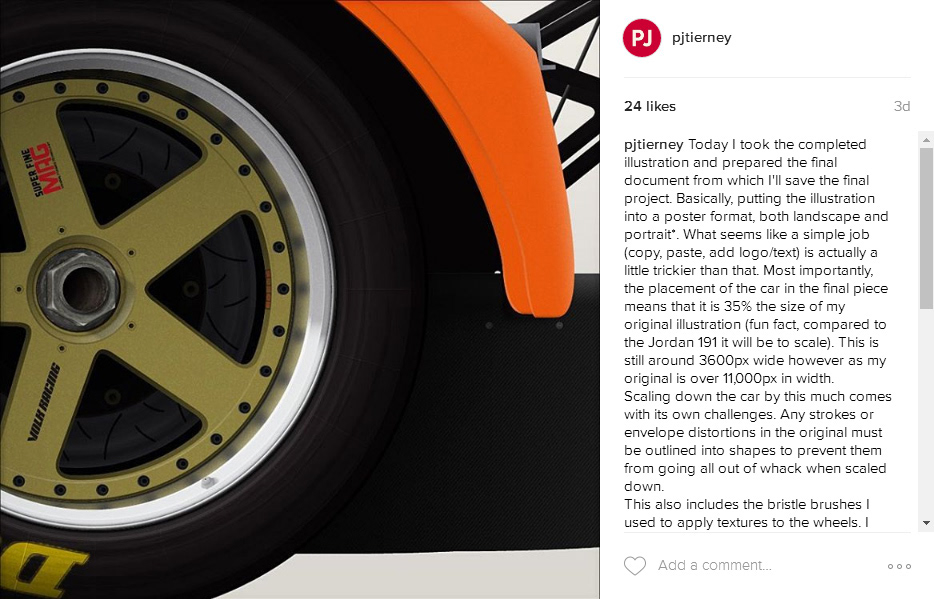
Today I took the completed illustration and prepared the final document from which I'll save the final project. Basically, putting the illustration into a poster format, both landscape and portrait.
What seems like a simple job (copy, paste, add logo/text) is actually a little trickier than that.
Most importantly, the placement of the car in the final piece means that it is 35% the size of my original illustration (fun fact, compared to the Jordan 191 it will be to scale).
This is still around 3600px wide however as my original is over 11,000px in width.
Scaling down the car by this much comes with its own challenges. Any strokes or envelope distortions in the original must be outlined into shapes to prevent them from going all out of whack when scaled down.
This also includes the bristle brushes I used to apply textures to the wheels. I used about 100 of these in total, and when converted into shapes I end up with an extra 8500 paths, bringing my original 10,000 up to almost 19,000 in total.
The wireframe for this project is almost pure black in some places as there are nearly 300,000 anchor points in the entire project. Those are scary numbers, I'm glad I didn't draw all those paths by hand!
Anyway, the document is now complete, which means I'll be able to launch the project soon. I'll need to dedicate an entire evening (maybe 2) to publishing this, will be writing up blog posts and such as its been such a long process.
I knew going into this that it would be more demanding than the Jordan 191, but I'm glad I took this on and I can be proud of the final piece.